Click HERE to return to the contents page
II. FINANCIALS [Time: 248:56 min.]
Manage the Chart of Accounts [Time: 25:23 min.]
We will discuss the Chart of Accounts structure and the effect of standard processes on the Chart of Accounts.
Your are implementing SAP Business One at a new customer:
Reflection Question: The Chart of Accounts
How are the Business Partner Master Data balances presented in the Chart of Accounts?
The Business Partner Master Data balances do not appear in the Chart of Accounts.
Control Account
Debit Credit
[411] Account Receivable (Customer)
105
[4427] Tax Account
5
[701] Income account
100
The Receivable [411] and Payable [401] control accounts accumulate the customer and Vendor transactions in their balances.
For example, when you post an A/R Invoice, the [411] Accounts Receivable account related to the Customer is used, in addition to the [411] Customer Account. Therefore, the Chart of Accounts presents the complete financial status of the company, as well as the Financial Reports (Profit & Loss, Balance Sheet).
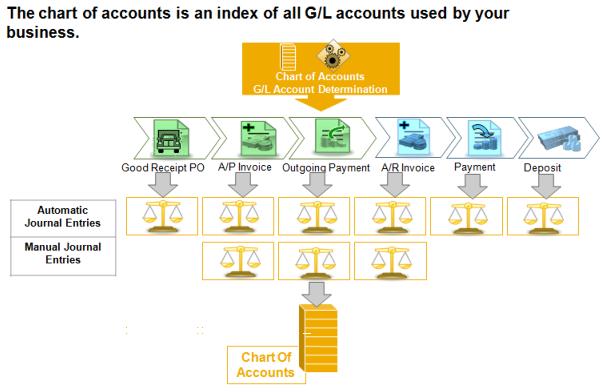
The Chart of Accounts is an index of all G/L Accounts used your business.
Every G/L Account has:
- An Account Code and
- Account Description and
- Other information that determines the functions of the G/L Account.
When you implement SAP Business One you define (or import) the Chart of Accounts.
Default G/L Accounts to be used when transactions are created in the different business process: Sales, Purchasing, Inventory and more.
The documents in the Sales and Purchasing process create automatic Journal Entries that are registered in the Journal Entry file and affect account balances.
The account balances are also affected by manual journal entries and other accounting transactions. For example, the Period-End Closing process that the balances of the Profit and Loss accounts to a Balance sheet account.
Define Valid Legal Chart of Accounts
You have 3 options for defining a Chart
of Accounts:
1. Select a pre-defined Chart of Account template. This option could be
suitable for a standard company, especially a new company without a legacy Chart
of Accounts. Note that once you have standard to work with the company database
you cannot choose a different Chart of Accounts template. You can however add,
update or remove accounts in the Chart of Accounts.
2. Import the Chart of Accounts data from a legacy system.
For this using the Data Transfer workbench (DTW) tool. If the company wants keep
their Chart of Accounts, they can still reorganize the structure before
the import. Alternatively, you can,
3. Define your own Chart of Accounts. This option
allows you to create your own customized Chart of Accounts. An organization ca
use this opportunity to determine what the Chart of Account structure should
look like to accommodate their needs.
Defining the entire Chart of Accounts is a long, complex procedure. You can use one of the existing standard Chart of Accounts and adapt it to the company's needs. work together with the client accountant to decide on the company's Chart of Accounts content and structure.
Although using one of the existing standard Chart of Accounts could suffice in many situations, organizations can take this opportunity to determine what the Chart of Account structure should look like to accommodate their needs.
The Chart of Accounts is organized by drawers and levels. Cannot be changed, organize in logical fashion appropriate to your localization's financials accounting an reporting processes.
Chart of Accounts varies according to the company's localization. The organization of the Chart of Accounts follows Generally Accepted Accounting Principles.
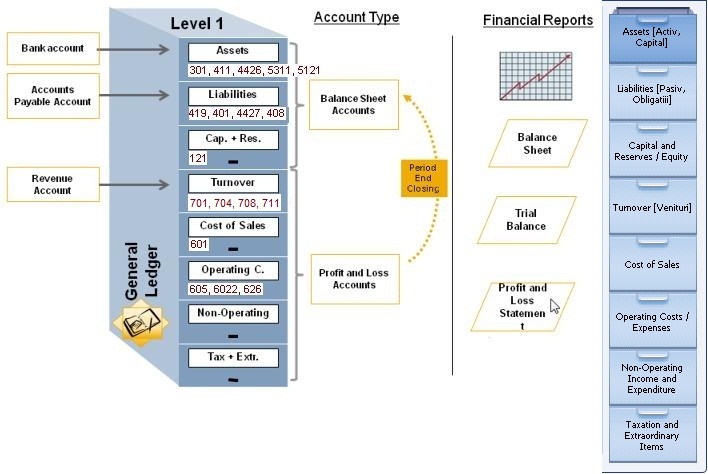
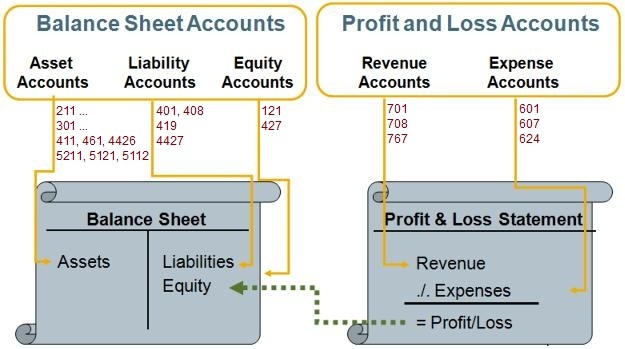
In the General Ledger, we distinguish between Balance Sheet Accounts and Income Statement Accounts, also called Profit and Loss Accounts.
Let us start with Balance Sheet Accounts: The first 3 drawers: Assets, Liabilities, Equity (Capital and Reserves) hold the Balance Sheet Accounts, such as the Sales Tax account and the Accounts Payable account.
The bookkeeping balance of these accounts is kept from one fiscal year to the next. The Balance sheet Accounts - reflect the monitory value of the company - stock, assets, debit, etc.
Next, we have the Profit and Loss Accounts.
The last 5 drawers: Revenues (Turnover), Cost of Sales, Expenses (Operating Cost), Financing (Nod-Operating Income and Expenditure), and Other Revenues and Expenses (Taxation and Extraordinary Items) hold the Profit and Loss Accounts, such as the Income Accounts.
Note that in some localizations, the lower drawers are not all Profit and Loss account drawers.
The bookkeeping balance of these has to be cleared at the end of each fiscal year - this is the Period-End Closing process.
The Profit and Loss Accounts reflect the changes in the company value, such as: when you sell stock - the Cost of Goods Sold Account is affected and increase revenues.
Demo - G/L Account Properties and Account Details in the Chart of Accounts
In this demo we will review the Chart of Accounts Structure including the drawers and the Balance Sheet accounts versus Profit and Loss Accounts.
We will then focus on the account definition and review the account details and how they influence the financial process in SAP Business One.
Let us look at the Chart of Accounts structure (open the Chart of Accounts).
The first 3 drawers: Assets, Liabilities, Equity (Capital and Reserves) hold the Balance sheet Accounts, such as the inventory account, the bank account, and the Accounts Payable Account.
The last 5 drawers: Turnover (known in some localizations as Revenues), Cost of Sales, Operation Costs (known in some localization as Expenses), Non-Operating Income and Expenditure (also known as Financing) and Taxation and Extraordinary Items (also known as Other Revenues and Expenses( hold the Profit and Loss Accounts, such as the Sales revenues Accounts.
Choose the [401] Trade Creditors in the Liabilities drawer.
When I choose a G/L Account, the account details appear on the left Beside the account Code and Name I can see the account balance.
I can navigate using the orange arrow to the line item display of the account. In the line item display, the system displays the debit values in blank and the credit in green and parentheses. This is the Accounts Payable account and it accumulates all vendor transactions in its balances.
Note that the Business Partner Master Data balances do not appear in the Chart of Accounts.
The [401]Accounts Payable account in marked as a Control Account (checkbox) and therefore can be assigned to Business Partners.
The balance of the Control Accounts represents the total accumulative balances of your customers and vendors. It is not possible to post directly to a control account.
In the Chart of Accounts display, I can mark and account as Confidential. Only users with General Authorization to confidential accounts can see and use confidential accounts. In the External Code field I can enter an alternative code for the account. The alternative code can be used by external programs that you integrate with SAP Business One.
Bank Accounts: Choose assets, scroll to bottom, choose the first bank account. Accounts that I mark as Cash Accounts (with the checkbox) appear as cash accounts in the Cash Flow report. Generally, all your bank accounts should be defined as cash accounts.
Choose a Sales Revenue account in the Turnover drawer. In the Account Type field, I define a Profit and Loss account as Revenue account type (Sales) or [60*] Expense account type (Expenditure). All other accounts should have the account type other.
If I choose the Account Details button, I can enter additional information about the account.
An Alternative Account Name can be specified for the account. This can be useful when the company works in different languages.
I can set a G/L Account as Active or On Hold for a certain period of time.
A VAT Group (or tax code) can be assigned to the account as a default to be used when creating manual Journal Entry.
If I mark the account as Relevant to Budget, and I have defined a Budget, the system will apply a check before posting to the account.
Chart of Accounts Structure in Association with Financial Reports
Financial reporting requirements drive most of the initial settings and configuration decisions in the Chart of Accounts. The different financial reports run on the account balances relevant to a selected range and present them according to their drawer, level and type:
The Balance Sheet summarizes the value of the business assets liabilities, and owner's equity accounts.
The Trial Balance displays for each account: beginning balance for a particular period, all of the debits and credits, and the ending balance.
The Profit and Loss Statement is determined after the end of fiscal year.
The balances of the [60*] Expense Accounts will be subtracted from the balances of the Revenue Accounts to come up with the profit or the loss for the fiscal year.
Levels in the Chart of Accounts
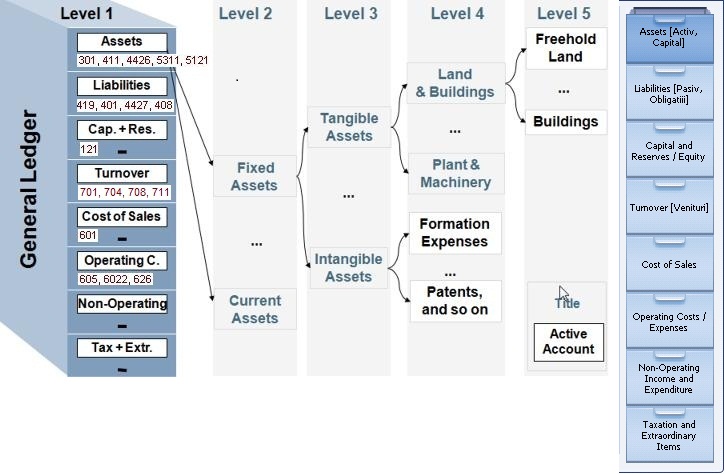
a chart of Accounts arrange a company's General Ledger accounts in a hierarchical structure.
The top level in the structure (level 1) consists of sections or groups for different type of accounts (assets, liabilities, capital and reserves, turnover, and so on). The number of account groups depends on the localization that was selected when the company was created and cannot be modified by the user.
The system displays the section as a cabinet drawer.
Each drawer has a section title, which you cannot change.
The system displays lower-level titles in blue and normal Active Accounts in
blank.
Accounts that you have entered in the G/L Determination (default
accounts) are displayed in green.
The Chart of Accounts varies according to the company's localization. Let us look at this example Chart of Accounts that contains 5 levels.
Levels 2 through 4 can contain either Active Accounts or title that combine several Active Accounts. Level 5 contains only active accounts.
Because only Active Accounts can be posted to in SAP Business One, it is a good practice to have all your Active Accounts at the same level.
In reports, a title account summarizes all the balances of each Active Account below it.
Demo - Manage the Chart of Accounts
We will look at two windows for maintaining the Chart of
Accounts:
- the Chart of Accounts window and
- the Edit Chart of Accounts window.
Chart of Accounts window: The main goal of the Chart of Accounts window, is to add new accounts, view information about existing accounts and update different properties of existing accounts and update different properties of existing accounts.
Note that title appear in blue, normal Active Accounts in black, and accounts, that were entered in the G/L Account Determination window (default accounts) are displayed in green. Such as [301] Row materials.
We can change the properties for a single account using the Account Details button.
We can also add new G/L Account to an existing title. Let us create an [60*] Expense Account. I choose the Operating Costs drawer (Expenses) and select the expenditure title under which I want to create the account.
Choose the level 4 Utilities title. To add a new account I must switch to Add mode. I choose Data > Add (or Add icon from Tools bar). I enter new accounts details. Since I am at the level for Active Accounts, the radio button for Active Accounts is automatically checked.
Now we will look at the Edit Chart of Accounts window. We
choose:
Financials > Edit Chart of Accounts and choose Operating Costs. In this window
we can:
- Add a New title.
- Delete an account
- Change the structure of Chart of Accounts and move title accounts within the
structure of the Chart of Accounts.
I select an existing Level 4 title in the Operating costs section (choose the Level 4 Utilities title) and choose Add Same-Level Account. Other option is Add Sub-Level Account. I need to make sure that the Title radio button is selected. And I enter the [60*] Expense Account details. I need to make sure that the Title radio button is selected. And I enter the [60*] Expense Account details. I choose Update to save the title. Notice titles appear in blue.
Now, I will add a [60*] Expense
Account under the new title I have
just created. Although I could add an account in the Edit Chart of Accounts
window using the Add Sub-Level Account button. In that window I will have
additional options in creating the account. also, note that if you are using
account segmentation you must use the Chart of Accounts window to add accounts,
since you cannot add segmented accounts in the Edit Chart of Accounts window.
Administration > Setup > Financials >
Account Segmentation [US Localisation]
I choose Operating Costs / Expenses drawer. I select the Media expenditure title under which I want to create the account. I choose Data > Add. since I am on the bottom level, level 5, the Active Account radio button is automatically marked. I choose Add.
It is a good practice to have all your Active Accounts at the same level. In our example it is level 5.
We realize that the mobile phone would be more appropriately placed in the media category, so we move the account under the title Media below the Internet account. In the Edit Chart of Accounts window, I choose the account Mobile Phone. I choose the parent article for the title Media. This will move the Mobile Phone account underneath the internet account once I choose Update.
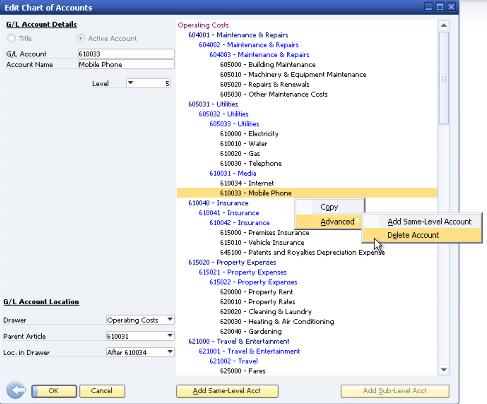
Let us look at how you can delete an unwanted account. Let us assume I made a mistake and created an account incorrectly, for example the Mobile Phone Account.
Note that you can only delete an account that has no posting.
I choose the account I wish to delete, the Mobile Phone Active Account.
I would
right-mouse click to see the context menu. I choose Advanced and then choose
Delete Account. At this point, I would choose Update if I actually wanted to
delete this account. However I do not actually want to delete the account, so I
choose Cancel.
Let us take a look at how the structure of the new accounts will appear in our Trial Balance report.
Financials > Financial Report > Financial an I choose the Trial Balance report.
I do not want see any Business Partners, so I deselect the Business Partner Box. I choose the Operating costs / Expenses drawer to see my new account structure. Since the new accounts do not have any balances yet, I deselect the Hide Acct with No Posting checkbox.
When the report first appears, we see only Level 1. I choose Level 5 (top left) to see my new title accounts. Here is the section for Utilities.
As you can see, the Chart of Accounts structure in SAP Business One affects the Financial Reports structure, in this case the Trial Balance report. Therefore, it is important to make sure you organize the chart of accounts by the levels and in the order appropriate to your preferred reporting structure.
Post a Journal Entry [Time: 33:10 min.]
Explain the ways to post Journal Entries in SAP Business One
Your are implementing SAP Business One at a new customer
The company accountant asks how she can record business transactions that do not have a document in SAP Business One.
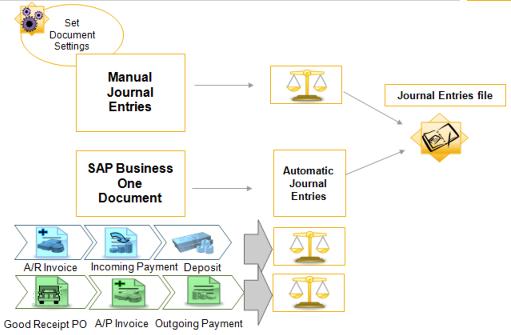
In SAP Business One, a Journal Entry is automatically posted from many documents, such as A/R and A/P Invoices.
Additionally, you can manually post a Journal Entry directly G/L Account or to Business Partner subledger account.
All Journal Entries are posted to one file in SAP Business One - the Journal Entry file.
You can set defaults for Journal Entries. You can also change some document settings for an individual Journal Entry.
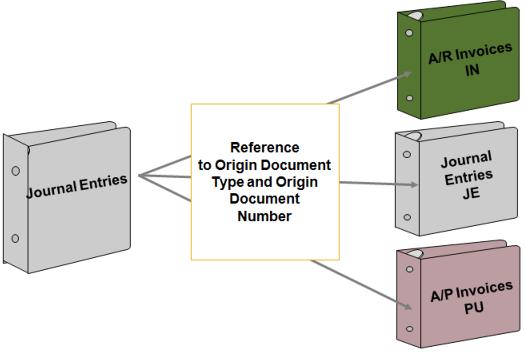
All Journal Entries refer to the type and number of original document, since frequently Journal Entries are created automatically from another document. For example, IN is used for customer invoices.
The origin documents of manual Journal Entries are the Journal Entries themselves. For this reason, they refer to themselves and are type Journal Entry (which is standard for Journal Entry).
Most Journal Entries refer to other document type (for example PU or AP invoices).
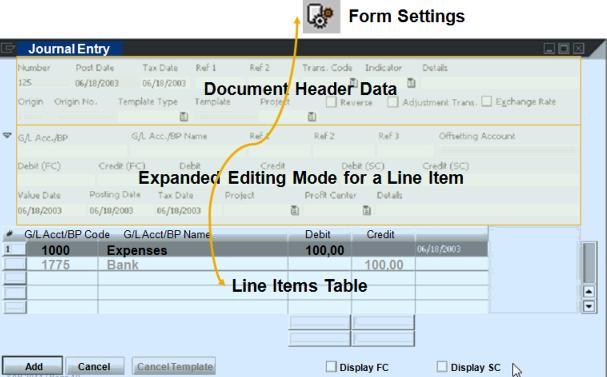
The screen for entering Journal Entries is divided into 3 areas:
- document header data,
- expanded editing mode for an item, and
- the items table.
You can show or hide the expanded editing mode. The mode always refers to the row that is currently selected and displays all the item fields for you enter the relevant data.
Using Form Settings, you can define which columns display in the line items table.
You can enter multiple lines which Debit or Credit amounts. In every line you add SAP Business One will recommend a balancing amount which you can update.
When entering manual Journal Entries, in each line, place the cursor in the G/L Acct / BP Code field and press Tab to display the accounts list, or Ctrl + Tab to display the Business Partner Master Data List. alternatively, you can search for an account or a Business Partner using the G/L Acct / BP Name field.
![]()
Users can make input errors. As a result, the Journal Entry created may
contain incorrect information. To provide an audit of the correction, the user
must first reverse the Journal Entry in error, and then capture the document correctly. You
can specify whether reversal transactions are performed:
- As standard reverse transactions or
- As reverse transactions with negative amounts.
The standard reverse transaction causes the system to post the Debit in error as a Credit and the Credit as a Debit. This corrects the balance of the accounts. However, the standard reverse transactions causes an additional increase in the totals on the Debit and Credit sides, which might be misleading.
The reverse transaction with negative amounts causes the system to post the Debit error as negative Debit and Credit errors as negative Credit. This not only corrects the balance of the accounts but also the totals.
It depends of the country whether standard reverse transactions or reverse transactions with negative amounts are required.
You can set which type of reverse transaction is used in the
Company Details:
Administration > System Initialization > Company Details > Basic Initialization:
Use Negative Amount for Reverse Transaction.
On the basic initialization tab, you can select the Use Negative Amount for Reverse Transaction field to switch on the reverse transaction with negative amounts. Otherwise, the system will use the standard reverse transaction. This setting is relevant for both automatic and manual Journal Entries.
![]()
You do not always need to create a manual Journal Entry to correct input errors.
In the sales and purchasing processes, most documents have a cancelling document which will automatically create the reversing Journal Entry. For example, you issue an A/R Credit Memo to cancel an A/R Invoice. This document will create a cancelling transaction automatically.
For manual Journal Entries - you locate the Journal Entry you wish to cancel and choose Cancel from Data Menu. In this session, we do not demo canceling documents. This topic is covered in the e-learning session for the Purchasing and Sales process.
In this demo we will review the Journal Entry file including automatic and manual Journal Entries.
Lets us look at automatic Journal Entries and demonstrate their structure.
Financials > Journal Entry window and browse to previous record. I browse back in the Journal Entry file to documents created automatically by Sales and Purchasing documents.
In the Origin field I see the type of document which created this Journal Entry. When I choose the linking arrow I open the origin document.
The Journal Entries screen is divided into 3 areas:
- document header data,
- extended editing mode for an item, and
- the items tables.
Header: In automatic Journal Entries created by the documents in SAP Business One, the fields are filed automatically from the document fields. In manual Journal Entries I set the values myself.
The system automatically enters a number in the document
header. This number is incremented with every transaction. I can define
numbering series for Journal Entries on the document Numbering screen, under
the:
Administration > System Initialization > Document Numbering.
The 3 dates in the header default to the current system date
but I can change them:
- Posting Date - This date determines the Posting Period, and therefore the
fiscal period for financial reporting. I can post an earlier or later date if
the Posting Period is Unlocked for posting.
- Due date - The date the transaction is due.
- Document date - The date used for tax reporting purpose.
I can use the Ref. 1 and Ref. 2 fields to enter references to associated actual documents.
I can also classify the document using a transaction code,
for example, as an actual / deferral document, depreciation document, or value
adjustment document for reporting purposes.
Administration > Setup > Financials > Transaction Code to maintain the
transaction codes. The system copies the description of the transaction code to
the Details field.
I can show or hide the expanded editing mode. The mode always refers to the row that is currently selected and displays all the item fields for me to enter the relevant data. The Ref. 1, Ref. 2, Project, and Details fields are usually filled with the content of the fields from the header area.
In this Journal Entries file I also record manual Journal Entries.
I I open the Journal Entry window from the Financials module it is already in the Add mode ready to entering a manual Journal Entry. To post a manual Journal Entry, I choose the Data menu and Add.
Like the automatic Journal Entry, the screen for entering
Journal Entries is divided
into 3 areas:
- document header data,
- extended editing mode for an item, and
- the items tables.
In the line, I place the cursor in the G/L Account / BP Code field and press Tab to display the Account list, or Ctrl +Tab to Display Business Partners Master Data list. Alternatively, I can search for an account or a Business Partner using the G/L Account / BP Name field.
After choosing the account or the Business Partner, I enter an amount in Debit or Credit. I enter 250 in Debit. I can enter multiple lines with Debit or Credit amounts.
In every line I add SAP Business One will recommend a balancing amount which I can update. Click Tab and choose the Bank Account in the second line and press Tab in the row fields to get 250 in Credit.
If I add data in the header area, for example if I add a remark, the it updates the lines with the header information.
Once the Journal Entry is completed and balanced I choose Add.
Using the Form Settings option, I can define which columns to show in the line items table. For example, I can show the Distribution Rule field if I want to allocate the amount from a row to Profit Center. Furthermore, I can store values in the settings that the system users as default values when I enter manual Journal Entries on the Document tab.
Form Settings > Document > General:
- Lock Posting Template
- Allow Unbalanced Transaction in FC
- Allow Multiple Currency Transactions
- Copy Posting date to Document Date
- Block dunning Letters
Administration > System Initialization > Document Settings and choose Journal Entry on the Per Document tab. Here I can define default settings for manual Journal Entries.
To cancel a manual Journal Entry - I locate the Journal Entry I wish to Cancel and Choose Cancel from Data menu. I approve the system message, enter any necessary changes and add the canceling Journal Entry. In the Remarks of the cancelling Journal Entry I have 'Reversal' and the number of the Journal Entry I cancelled.
Note that the Cancel option is not available for automatic Journal Entries. You must use a reversal document instead.
The reverse method will be the Standard one or the Negative
amount method as I defined it in the
Administration > System Initialization > Company Details window
> Basic Initialization, under the Use
Negative amount for Reverse Transaction field.
Let us look at some reports that show different aspects of
the Journal Entry file:
Financials > Financials Report > Accounting > Transactions Journal Report. The
Transaction Journal Report shows all the Journal Entries of a certain origin type in
chronological order, sorted by transaction number. From here, you can go
directly to the origin document for the posting.
Financials > Financials Report > Accounting > Document Journal. The document Journal report is a similar report. Here you can use more options to select and tailor the output.
Financials > Financials Report > Accounting > General Ledger. The General Ledger report provides a view of the selected General Ledger and Business Partner accounts and lists all line items that you have posted to the account.
You can post a Journal Entry by:
In the next two slides we will review two template types for posting a Journal Entry. Template with Percentages and Recurring Postings.
Posting Template with Percentages
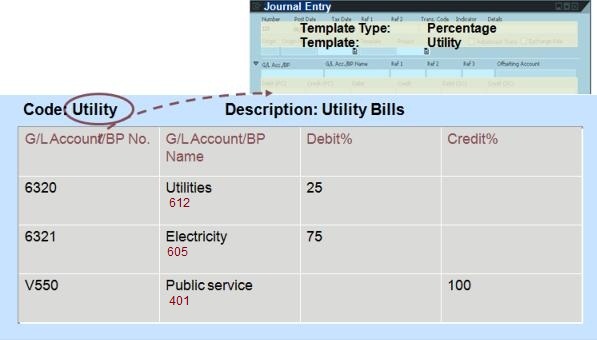
You can create posting templates for Journal Entries that have a very similar structure. These templates can contain account numbers but you can also just specify an account description in a line item if you do not yet know which exact account will be used for this line item. Instead of fixed amounts, only percentages are entered here. These percentages indicate how the total amount is distributed among the line items. The illustration shows an example of how you can allocate a utility expense, like the electric bill, to its component expenses at a specific percentage rate. The posting template is stored under a code and with a description. Then, when you enter a Journal Entry manually, you can choose the Percentage template, enter an amount in one the line items and the template will allocate the amounts to the other lines based on the percentage rate you have defined.

SAP Business One features a recurring posting function for similar, fixed amount Journal Entries created on a regular basis. Recurring Postings use a template that is stored with a Code and a Description.
In his template, you define, among other things, the frequency in which the Journal Entry is supposed to be created and a validity date until the recurring posting is valid.
The system duplicates the original Recurring Posting (instance 0) every time the execution date arrives, and presents a report recommending you post the transactions that are due. Once you use this instance and add it to the system, it will be Deleted.
You can add Recurring Postings to the Cash Flow, which appear in green in the report.
Options for Recurring Postings
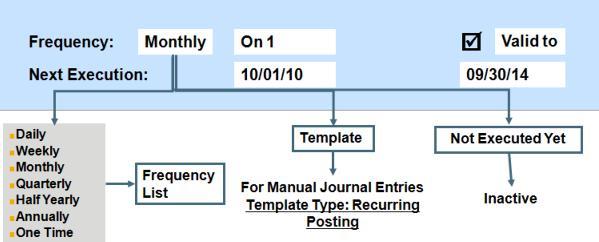
You have a few options when you set up a recurring posting. You can set the frequency for how often the posting will occur. You can choose a frequency from a frequency list. You can also set a validity date for the posting which specifies the last possible date a posting can be made.
If you do not whish to post on regular basis, you also have an option to set up a recurring posting as a template to be used as needed. You can create these recurring posting in advance. Set the status to "not executed yet" until you need to begin the postings. This status can also be used to turn off a recurring posting.
We will demonstrate the two template types: Template with Percentages and Recurring Postings.
Financials > Posting Templates to enter and maintain Posting Templates.
Here is a Post Template I have defined earlier. I use it to allocate out a utility expense, like the electric bill, to its component expenses at a specific percentage rate.
Note that the template contain account numbers but I can also just specify an account description in a line item if I do not yet know which exact account will be used for this line item.
Instead of fixed amounts, only percentages are entered here. These percentages indicate how the total amount is distributed among the line items.
Financials > Journal Entry. When I enter a Journal Entry manually, I choose Percentage in the Template Type field an enter the template code in the Template field or press tab and choose it from a list. According to the transaction I am now recording, I enter an amount in one of the line items and press Tab. The template will allocate the amounts to the other lines based on the percentage rate.
Financials > Recurring Postings to enter and maintain Recurring Postings. Here is a Recurring Posting I have defined earlier for rental amounts our company pays once month.
In this template I defined fixed amounts as well as the frequency in which the Journal Entry is supposed to be created and until when the Recurring Posting is valid. The possible entries in the Frequency field include: Daily, Weekly, Monthly, Quarterly, Half Year, Annually. I must also specify the next execution date for these entries.
One time: Although a one-time Recurring Posting seems a bit odd, it serves a
special purpose. with this I can schedule a Journal Entry for a specific date.
Template: Journal Entries that I need repeatedly but not a regular basis can be created as
this type. I can access these templates from the manual Journal Entry.
Not executed yet: If I do not need the Recurring Posting at present, I can turn it off with
this entry.
In the Valid To field, I can enter a date until which the Recurring Posting is valid and will be executed by the system.
Ho do I execute the Recurring Posting?
Financials > Recurring Posting. The I choose Confirmation List to display the postings for execution.
In the Confirmation of Recurring Posting window a list of all instances of Recurring Posting templates that are due until today appear. In the Confirmation of Recurring Posting window a list of all of all instances of Recurring Posting templates that are due until today appear. The system duplicates the original Recurring Posting (instance 0) every time the execution date arrives. I use this window to define which instances I want to save to the database and which can be removed form the list I select the Recurring Posting I just created. I choose Execute to post the entry and choose Add to the system message.
If I need to make an adjustment to the entry, I can use the navigation arrow to open the transactions instance, and make the change, before I post it to the Journal Entry file. Once I use this instance and add it to the system, it will be deleted.
I can also configure the system so that the execution list is displayed automatically in the execution date as soon as I log on.
Administration > System Initialization > General Settings > Service tab: Display Recurring Postings on Execution indicator to activate this service.
Note: I can also execute a Recurring Posting manually: in the Journal Entry window I display a list of all the Recurring Posting in the system. I choose a Recurring Posting instance; I can then adjust the posting and add it.
SAP Business One offers a two-stage procedure for creating Journal Entries. You create the Journal Entries as drafts first, correct and post them later. A user create entries in a JV. The JV is basically a folder for storing several Journal Entry drafts. You can save unbalanced Journal Entries in a JV as long the JV is in the draft mode. You can change JVs as long as they have not posted yet. You can acces the JV, make any necessary corrections, and post the entire JV.
You do not have to post each Journal Entry individually. If you do want to post Journal Entries individually, however, joy must create a separate JV for each Journal Entry draft.
You can remove JV or Delete an entry from JV, as long as they have not been posted yet.
We will demonstrate the process of creating a JV and reviewing it before posting as Journal Entries.
Financials > Journal Voucher. Next, I choose Add Entry to New Voucher. I enter a Journal Entry. In this example, I post a Debit for an expense to an Expenses account and Credit the same amount to my Bank account. To choose the [60*] Expense Account I type "te" in the G/L Acct / BP Name field, an then I press Tab. From the account list I choose the "Telephone" account. I choose Add to voucher.
The, I enter a second Journal Entry. I Debit the Bank account and Credit a vendor. I choose Add voucher. I Close the window.
Let us assume that I need to update one of the entries in the JVs screen.
I highlight the JV I have just created. I double-click the second transaction and change the Vendor in the JV entry. I double-click the second transaction and change the Vendor in the JV entry.
Note that I can duplicate a row in the JV, I can also quickly remove one of the rows, by right clicking it.
Next I post JV to the Journal Entries file. In the JVs window, I highlight the JV I have just updated and I choose Post Voucher. I choose Yes in the system message.
Let us check whether the postings have been made in the General Ledger.
I open the Journal Entry window. I choose Previous Record to display the second entry I posted to the JV. If I choose the link arrow in the Origin field I can view the Closed JV.
Internal reconsolidation [Time: 17:54 min.]
We discuss how to utilize the process of internal reconciliation, both system and user reconciliations, in G/L Accounts and Business Partner. You will learn how to review automatic and semi-automatic system reconciliations, and how to perform Internal Reconciliation manually.
Imagine that you are implementing SAP Business One at new customer. Maria, the accountant of company, asks you more about the Internal Reconciliation Process.
She remembers you told her previously, that among other processes, it relates to Period-End Closing: [...] Automatic system reconciliations ca be full or partial.
You give Maria two examples of full automatic reconciliations:
- First, in the Business Partners Master Data accounts when an Incoming Payment
is based on an A/R Invoice (or a Credit Memo on an A/R Invoice).
- Secondary, in
[581]
Clearing G/L Accounts when you Deposit a check received by an
Incoming Payment.
You tell Maria that SAP Business One also performs Partial Reconciliations if, for example, a customer partially pays an A/R Invoice.
However, these will be causes where Maria will perform Internal Reconciliations herself - these are the User Reconciliations. For example, when a company pays a Vendor in advance and receive the A/P Invoice later on, Maria will have to internally reconcile the Vendor Master Data and mach the Payment with the A/P Invoice transactions.
Just like with System Reconciliations, user reconciliations can be full or partial.
Reflection Question: Internal Reconciliation Process
The A/P Invoice should appear as closed for:
- The Outgoing Payment
- Reports as Aging and Doubtful debts.
Let us consider the case we have just discussed, where company pays a vendor in advance and receive the A/P Invoice lather on. When Maria looks at the vendor's account balance, it reflects the advanced Outgoing Payment and the A/P Invoice transactions.
The reason is that if reconciliation is not dome, the A/P Invoice will appear as open when creating a new Outgoing Payment for the Vendor.
Another reason is the effect on reports, such as Aging and Doubtful debts.
The A/P Invoice appear as open in those reports if Maria does not reconcile it with the Outgoing Payment transaction.
Internal Reconciliation Definition
The term, Internal reconciliation, refers to the matching and
clearing of open credit items top open debit items within an account (therefore
internal). This is necessary for accounts where a business process is not
regarded as fully complete until each credit amount has a corresponding debit
amount:
- For [411] Customer Accounts, a receivable (Debit) must be followed by an Incoming
Payment (Credit).
- For [401] Vendor Accounts, a liability (Credit) must be followed by an Outgoing
Payment (Debit).
As we mentioned before, the system can reconcile transactions either fully or partially.
System reconciliation takes place automatically. Let us discuss a few examples: When you apply a payment to an invoice, create a Credit Memo for an invoice or Cancel document, the original Journal Entry is reconciled with the reversal.
When you Deposit a check, the payment Journal Entry is reconciled with the Deposit for the [581] Clearing Account row. This means fir the most part, you do not have to maintain and conduct Internal Reconciliations in the system. As we mentioned before, the system can reconcile transactions either fully or partially.
System Reconciliation - Full Reconciliation
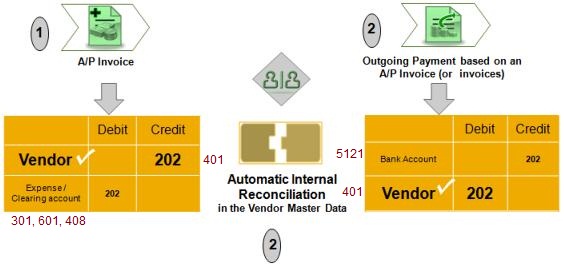
The system will attempt to automatically perform full reconciliation when you post a payment for a customer or vendor. The system matches the business rows in the Journal Entry of the payment with the invoice or invoices that you have selected and closes the transactions.
it will also close any selected Credit Memos and other transactions that were selected in the payment.
In the graphic we show how full system reconciliation occurs with an Outgoing Payment to a vendor. On the left we show the A/P Invoice with its Journal Entry. On the right we see the Outgoing Payment for the invoice. When the invoice is paid, the system automatically performs internal reconciliation in the vendor master record.
In this example, we shows only one invoice, but the payment could have paid 2 or more invoices and the automatic reconciliation would still have been performed.
For payments made with the Payment Wizard or Bank Statement Processing, the system automatically proposes (and sometimes automatically matches) payments with invoices or Credit Memos based on criteria that you supply, such as due date and amount.
System Reconciliation - Partial Reconciliation

It is possible to partially reconcile transactions when issuing incoming or Outgoing Payments. Partial reconciliation is done when a payment amount does not match the amount of the selected transactions.
For example, a customer may pay a partial amount due. When a partial payment is made, the system adjusts the Balance Due appropriately and partially reconciles the invoice. When the remaining balance on the invoice is paid the invoice will be fully reconciled and the Balance Due will become zero.
Now we look at both full and partial reconciliations. In this demo we will review the automatic reconciliation created in SAP Business One while issuing a payment based on invoices. I will demonstrate a full and partial reconciliation.
I have just received a payment from one of our customers:
Banking > Incoming Payments > Incoming Payments and create an Incoming Payment.
The customer
fully pays 2 A/R Invoices that are due. 2 days later the customer sends me
another payment. This time the customer pays of the A/R Invoice total amount. I
choose the invoice and change Total Payment amount in the invoice row to XXX.
This is a partial payment.
Now let us look at the reconciliation created in SAP Business One. In browse to the customer Master Data and open the [411] Customer Account Balance using the linking arrow.
We see that 2 A/R Invoices and the first Incoming Payment do not appear. Why is that? This is because they were automatically reconciled. The 2 invoices on the debit side against the Incoming Payment on the credit side [and Display Unreconciled Trans. Only is checked]. And why is the second Incoming Payment that was allocated to the third invoice does not appear? That is because it was fully closed on the credit side. The third A/R Invoice appears because it was partially reconciled on the Debit side.
In the Credit/Debit amount field of the transaction we see the full invoice amount. The Balance Due amount reflects the remaining Debit amount to be paid by the customer.
When I un-check the Display Unreconciled Trans. box, the first 2 A/R Invoices and the 2 Incoming payments appear too, but with a zero Balance Due amount.
User Reconciliation - Manual Type
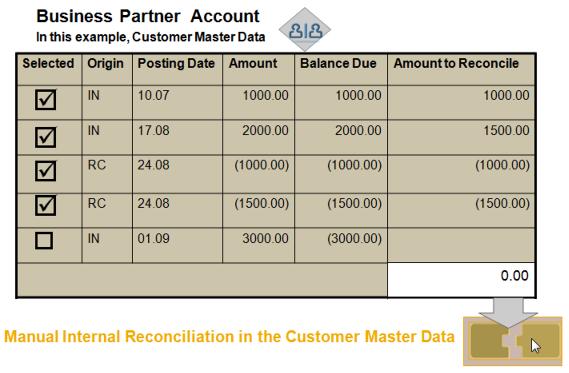
A customer pays you but you forget to select the invoice when processing the payment. In that case, a payment is made on account rather than against a particular invoice. If the payment was posted as a Payment on Account, because no invoices were selected, the payment and the invoices stay open (and therefore unreconciled). Another example of payment on account might be where you have an agreement for a customer to pay a set amount each month regardless of the actual invoice amounts. Once again, because no invoice are selected, the invoices are unreconciled.
In these cases you need to reconcile the account with the Reconciliation function - as a User Reconciliation.
User Reconciliation: G/L Account
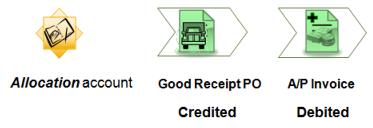
Allocation account: Good Receipt PO Credited > A/P Invoice Debited.
You can also perform user reconciliation in a G/L Account. If you company users the Perpetual Inventory system you usually reconcile the Allocation account. Remember an Allocation account is credited when you issue a Good Receipt PO and Debited in an A/P Invoice.
You can perform user reconciliation in this account.
User reconciliation types:
- Manual
- Automatic
- Semi-automatic
Manual is useful when working with a small number of transactions or cases where partial reconciliations are required or where transactions are posted to more than one Business Partner.
Automatic is used to reconcile a large amount of transactions, or a range of Business Partners, based on user defined parameters and priorities.
Semi-automatic is used to manually reconcile transactions, based on recommendations provided by SAP Business One.
Unique identifier for Internal Reconciliations:
The system assign a unique reconciliation number to each completed Internal Reconciliation (whether it is manual, automatic, or semi-automatic). The system also saves and assigns a unique number to system reconciliations, for example, reconciliations during payment processing.
Manage Previous Reconciliations
The Manage Previous Reconciliations function allows you to review or Cancel a user reconciliation.
Demo - User Reconciliation - Manual Type
Now we look at how to do a manual type user reconciliation. In this demo we will review the user reconciliation process. I will show you how to manually reconcile the transactions in the Business Partner Account.
Let us imagine that a customer paid us on account according to
an agrement we have and that I posted the invoice a month later when the actual
deal happend. Both the invoice and the Incoming Payment transactions stay open
and I need to reconcile them. To perform an Internal Reconciliation for the
Business Partner, I choose:
Business Partner > Internal Reconciliations > Reconciliations.
Note: I can also access Internal Reconciliation from the Account Balance in the Business Partner Master Data.
When I internally reconcile a Business Partner or G/L Account, I choose the reconciliation type: Manual, Automatic and Semi-Automatic.
Automatic is used to reconcile a large amount of transactions, or a range of Business Partners, based on user defined parameters and priorities.
Semi-Automatic is also typically used to reconcile a large amount of transactions; however the user needs to manually confirm the recommendations provided by SAP Business One.
In our example I choose the Manual reconciliation type. I can
conduct manual reconciliation for Multiple BPs, by checking the
Multiple BPs box.
This is useful especially in cases where I have a customer, that is also a
vendor, and I would like to reconcile A/R Invoices with the A/P Invoices of that
Business Partner.
In this case, I choose our customer and then Reconcile. The system displays all transactions for the account that are open on the current date. If desired, I can change the date to see open transactions for a different date. In manually select matching Debits and Credits. In this case I choose the open A/R Invoice and Incoming payment.
When the total of all the Credit items selected for reconciliation by choosing Reconcile. If the total of the selected Credit items does not match that of the Debit items, I can either: Partially reconcile one of the transactions by changing the Amount to Reconcile for the transaction or I can create a Journal Entry to post the difference as an adjustment that results in the selected transactions becoming reconciled. Our 2 transactions match so we choose Reconcile.
Note: To perform an Internal Reconciliation for G/L Account,
choose:
Financials > Internal Reconciliations > Reconciliation.
Let us assume that the reconciliation we have just added was
wrong. To Cancel a user reconciliation for a Business Partner, I choose:
Business Partners > Internal Reconciliations > Manage Previous Reconciliations,
allows you to review or Cancel a user reconciliation.
You can select reconciliations by account, reconciliation date, and reconciliation number, and then Cancel them individually. I choose the Business Partner Code in the Form and To fields and choose OK.
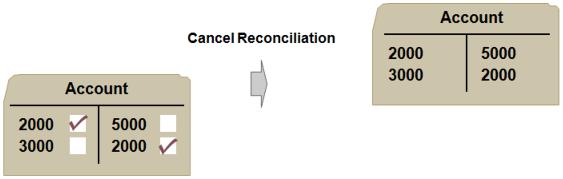
In the Reconciliation History table at the top I choose the reconciliation to be cancelled. I can review the reconciliation details at the bottom and then I choose Cancel Reconciliation.
Note that in this window I can review system reconciliation but I cannot Cancel them. Also note that this function does not allow you to reverse reconciliation Journal Entries. The postings still exist even though the reconciliation has been Canceled.
If you want to reverse these postings, you must reverse them in the general ledger in the usual way by choosing Data > Cancel in the Journal entry display.
Financial Reports [Time: 13:53 min.]
You review the Financial Reports with Maria the company accountant:
Note that the company usually gets last year's related documents after the end of the financial year or period. Therefore, they also issue the reports for the Closing Period, during the following period.
Balance Sheet:
- Fixed Assets: 10.04%
- Current Assets: 89.96%
Total Assets: 100%
From a financial controller's point of view where is most of the money invested?
At the end of the year you issue the Balance sheet report. You present the report in a summarized form.
For the Assets Drawer you see the following result.
Let us go back and examine the Chart of Accounts Structure in association with Financial Reports. This subject is discussed in the Manage the Chart of Accounts topic.
Although the Chart of Accounts will way according to a company's localization, the structure are very similar around the world.
Remember how in the General Ledger you distinguish between Balance sheet Accounts and Income Statement Accounts, which are also called Profit and Loss Accounts?
Influence on Financial Reports
The different reports run on the account balances relevant to a selected date or date range and the reports present them according to their drawer, level or type. For example, the Balance Sheet report is based on the Balance Sheet accounts and similarly the Profit and Loss statement is based on Profit and Loss accounts. The Trial Balance shows all the accounts types. All these reports are typically issued for the last day of each financial year or period.
Presents the financial position of a business, the company's value
| Dates | Up to a certain date |
| Drawers | All Balance Sheet
Accounts: Assets, Liabilities, and owner's Equity accounts |
| Calculation | Total Assets =
Total Liabilities + Equity Also: Relative percentage of each balance in the company's assets, liabilities, and equity set. |
| Example of documents and accounts affecting the report |
A/R Invoice -
[411] Accounts receivables, Sales tax account. Outgoing Payment - Bank account Good Receipt PO - Inventory account |
Dates: You run the Balance Sheet up to a certain date, that is from the beginning of the company until that date.
Drawers: The Balance Sheet presents all Balance Sheet Accounts: Assets, Liabilities, and owner's Equity.
Calculation: When you issue the report, the system runs the report on the account balances of the Balance sheet accounts and summarizes their values according to the formula: Total Assets equals Total Liabilities plus Equity. In addition, the relative percentage of each balance in the company's assets, liabilities, and equity is presented. The Equity section includes the profit period. This amount is calculated while the report is being composed, to represent the summary of the Profit and Loss of the period.
Example: Some examples of documents and their related accounts which affect the report. [411] Accounts receivable and the Sales tax accounts in an A/R Invoice. The bank Account in an Outgoing Payment. The Inventory account in a Goods Receipt PO.
Financials > Financials Report > Financials > Balance Sheet. In the 'T' field, I choose the end period date of the previous period.
Note that there is no 'From' field as the Balance Sheet accounts accumulate the company's value from day one.
I can choose to 'Add Closing Balances' to include period end Closing transactions in the report.
Each first-level title, that is a drawer, equal 100% - Assets, Liabilities, and owner's equity, seen here as capital and Reserves.
When I drill down to a lower account level I see the titles and the active G/L Account displayed with their relative percentage in the drawer. I choose level 5 to see the most detail.
Note that the accounts appear according to their order in the Chart of Accounts, for example Bank Account.
At the bottom of the Report, under the Equity section, I can find the Profit for the Period selected. This is not a specific account, rather, it is a calculation done while composing the report.
A summary of all accounts and / or Business Partner balances. Can comprise a particular cross section
The Trial Balance displays a summary of all accounts and / or Business Partner balances. The report can comprise a particular cross section of accounts and Business Partners.
Dates: You can issue the report for a selected Posting Period or periods.
Drawers: The Trial Balance presents all selected accounts (Balance Sheet and Profit and Loss) and Business Partners Master Data.
If you include Business Partners in the report, those will be shown at the end, after the list of accounts. The total balance for customers and vendors is represented in the list of accounts, through the control accounts balances.
Calculation: When you issue the report, for each account the system presents the total Debit and Credit amounts, and the ending balance which is calculated as the Debit amount minus the Credit amount. For the entire report: if the Trial Balance includes all the accounts in a complete period, the Debit and Credit side totals must be equal. That is, the total report balance should be zero.
Example: Here is an example of a document and its related accounts which affect the Trial Balance report. An A/P Invoice includes: the Vendor, the Account Payable account, a [581] Clearing Account or an Inventory account, and the Output Tax account.
Now we will tun the Trial Balance for all our accounts and out Business Partners.
The Trial Balance can comprise all accounts (Balance Sheet and Profit and Loss) and all Business Partners Master Data. Or, you can run it a particular cross section of accounts and Business Partners.
Financials > Financials Reports > Financials > Trial Balance. In our example I choose all accounts and Business Partners by choosing the Select all button at the bottom.
I can issue the report for a selected Posting Period or periods. I will tun the report the previous fiscal year. I can choose whether to include the opening balance for each account in the report.
The Trial Balance displays a summary of all accounts and Business Partner Balances.
In Assets we see the totals for A/R receivables listed under trade debits. And here are the totals for our Trade Creditors.
In Liabilities we see the totals for A/P payables.
We scroll down the bottom of the report to see a list of Business Partners with their individual Business Partner account balances.
For each account the system presents the total Debit and Credit amounts, and the ending balance which is calculated as the Debit amount minus the Credit amount plus opening balance amount if you choose to present it on the report.
Note that the balances are already included in the total amount of the report, using A/R and A/P control accounts.
Shows the Profit (or Loss) of your business for the fiscal year / selected period, and explains the change in the company's value
| Dates | Selected period |
| Drawers / Type | all Profit and
Loss Accounts: The last 5 drawers: Revenues, Cost of Sales, Expenses, Financing, and Other Revenues and Expenses |
| Calculation | The balances of the [60*] Expense accounts will be subtracted from the balances of the Revenue accounts to come up with the Profit or Loss for the fiscal year / selected period. |
| Example of documents and accounts affecting the report |
A/R Invoice -
Income account. A/P Invoice - [60*] Expense account |
The Profit and Loss Statement shows the Profit (or Loss) of your business for the fiscal year or the selected period.
It explains the change in the company's value.
Dates: You run the report for a selected period.
Drawers: The Profit and Loss Statement presents all the accounts located in the 5 Profit and Loss drawers: Revenues, Cost of Sales, Expenses, Financing and the Other Revenues and Expenses.
Calculation: When you run the report, the system calculates the Profit and Loss for the fiscal year or the selected period according to this calculation: The balances of the [60*] Expense Accounts will be subtracted from the balances of the Revenue accounts.
Example: and here are some examples of documents and their related accounts which affect the report: The income account in an A/R Invoice. and the [60*] Expense Account in an A/P Invoice.
Now we will run the Profit and Loss report.
Financials > Financial Reports > Financials > Profit and Loss Statement.
The Profit and Loss Statement shows the Profit (or Loss) of your business for the fiscal Year or selected period. Therefore, it does not include any opening balance. The report presents all Profit and Loss Accounts in the last 5 drawers.
The balances of the [60*] Expense Accounts are subtracted from the balances of the Revenue account and result in the Profit for the Period.
The balance Sheet calculation is: Total Liabilities + Equity
How is the calculation balanced if the report considers only the Balance Sheet accounts?
Here is a question for those of you with accounting backgrounds: The Balance Sheet calculation is: Total Assets equals Total Liabilities plus Equity.
How is the calculation balanced if the report considers only Balance Sheet accounts?
The Profit or Loss Accumulator is included in the Balance Sheet report and will either increase of decrease the Equity on the Balance Sheet.
Company Analysis and Planning [Time: 26:52 min.]
In previous year Company entered the fiscal year with higher expenses than expected:
Imagine that you are implementing SAP Business One at new company.
Maria, the accountant, says that in previous years company ended the fiscal year with much higher expenses than expected.
Note that you need to make decisions about Budget, Projects, and Cost Accounting definitions together with the client accountant.
The Budget module helps you manage and track company expense.
You can block the creation of transactions for G/L accounts that exceed their budget limit
The Budget module helps you manage and track company expenses.
The purpose of budgeting is to provide a forecast of expenditures, in other words, to construct a model of how a business might perform if certain strategies, events and plans are to be carried out. This way, the actual financial operation of the business can be measured against the forecast.
In SAP Business One, a budget is based on the data your enter, which specifies the maximum amount that can be allocated to a particular G/L Account on a monthly or annual basis.
In the course of daily routine, the application checks the debit side of G/L Accounts for which a budget has been defined.
If the Budget is exceeded, the application either issues a warning or blocks the action, depending on the chosen setting.
Note that the budget functionality works with calendar months only.
Steps to activate the Budget functionality:Let us review the steps you need to take in order to activate the budget functionality:
If you decided to manage your budget on a monthly basis, you can define Budget Distribution Methods.
Note that Budget distribution Methods are not relevant for working with an annual budget.
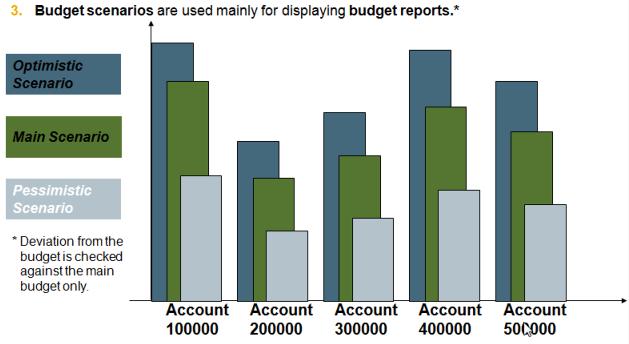
3. Budget scenarios are used mainly for displaying budget reports.
Using as scenario, you create a prognosis of a particular situation for the company's Budget and obtain important information about what the budgetary balance would be according to the selected scenario. For example: an optimistic scenario versus a pessimistic scenario.
The supplement budget scenarios can be based on a scenario with an initial ratio.
When you set up new company, the application provides a default scenario called Main Budget. This scenario cannot be altered.
Remember, this scenarios are only for budget reports.
In the course of routine work, deviation from the Budget is checked against the Main Budget only.
4. Define Budget
amounts
5. Performa an analysis by
comparing the defined budget with actual business activity.
After you have defined Budget scenarios, it is now time to define Budget amounts.
You specify the maximum amount that can be allocated to a particular G/L Account.
The actual financial operation of the business can be measured against the forecast.
Budget amounts can be copied from a previous fiscal year or imported from a different company database with the same G/L Accounts.
Once the Budget is defined for the selected accounts, you are able to perform an analysis by comparing the defined budget with the actual business activity.
An automatic check for deviation from the Main Budget scenario is executed, and if the Budget is exceeded, an alert is issued.
You can define authorizations for users to confirm budget deviation.
Budget Report analyzes the business activities that occur during a defined period with reference to a selected budget scenario.
Company Budget Reports: The standard company reports can be displayed with the budget data
Run the Budget reports according to a preferred Budget scenario
In the course of routine work, when you create a transaction against an expense G/L Account which is Relevant to Budget, a check for deviation from the Main Budget scenario is executed, and if the budget is executed, and if the Budget is executed, an alert is issued.
Administration > System Initialization > General Settings > Budget, there is a Budget clause in which you can define authorization for users to confirm Budget deviation in case a G/L Account exceeds the Budget and an alert is displayed.
The Budget Report enables you to display the company's Budget data according to your requirements.
The first step in the process is Budget Initialization
Administration > System Initialization > General Settings > Budget: Budget Initialization checkbox. When I update, I have the option to Mark all P & L accounts as Budget accounts. I choose Yes. As a result the Relevant to Budget checkbox is selected in all your Profit & Loss G/L Accounts.
Financials > Chart of Accounts > Account Details pushbutton. I can also manually select non Profit & Loss G/L Account to be relevant to the Budget by selecting the Relevant to Budget checkbox for each G/L Account.
Next, I define the system reaction for a document that deviates from the Budget definition: I choose "Warning". Also "For Annual Budget" and I choose all 3 levels: Purchase Order, Good Receipt PO and Accounting. If the Purchase Order, Goods Receipt POs, and Accounting checkboxes are selected, the application performs a check for deviation from the Budget during the generation of Purchase Orders, Good Receipt POs, and A/P Invoices and Journal Entries.
I can skip step 2: Define Budget distribution Methods, since budget distribution methods are not relevant for an annual budget.
Financials > Budget Setup > Budget Scenarios and define 2 Budget scenarios: I choose Data > Add Row (Ctrl + I). The first row is the Main Budget by default and I cannot change it. I choose Update. Then I can add another row. The second row will be an 'optimistic scenario' based on the main scenario with 110% of initial ratio. I enter Optimistic Scenario, choose Main Budget as the base and set the ratio to 110%. Then Update.
After I have defined Budget scenarios, it is now time to define Budget amounts.
Financials > Budget setup > Budget: Main Scenario and OK
At the top of the window, we see the title shows Main Scenario and the fiscal year is displayed. At first no accounts appear because there is nothing budgeted yet. I choose Display accounts with no budget to display all my accounts.
In the Debit column I define Budget amounts for 3 [60*] Expense Accounts.
Budget can be initialized at any point in time even if you already used the system for some time. In this case, you have an option to define budget amounts form this point going forward or define you total annual amount. The system asks me "Has transactions in system?" When I answer Yes, the system includes the actual so far. [The Debit amount is automatically copy to Actual].
Note that you can define Budget amounts only for G/L Accounts which are defined as Relevant to Budget in the Chart of Accounts.
Also note that SAP Business One checks the Budget for deviations against the Debit side. Thus, alerts are only triggered for accounts with a Budgeted amount in the Debit column.
You can use the Credit field for Sales Accounts to set revenue targets which you can track with Budget Report.
Now I will enter a Service A/P Invoice. Remember we selected a warning to occur if we exceed the budget when adding an A/P Invoice. Then choose one the [60*] Expense Accounts for which I have entered Budget amounts in the previous step. I see the Budget deviation alert as I choose an account which is Relevant to Budget. A check for deviation from the Main Budget scenario was executed, and because the budget is exceeded, an alert is issued. "Amount exceeds Annual budget for account 610034". As I have permission to approve Budget alerts I can proceed adding the A/P Invoice.
Administration > System Initialization > Authorization > General Authorizations: Financials > Budget setup, there is clause in which I can define Authorization for users to confirm Budget deviation in case a G/L Account exceeds the Budget and an alert is displayed.
Financials > Financials Report > Budget Reports > Budget Reports. I choose the main scenario, and the current fiscal year. I have the option to include any "Future Balances". This means the system will consider Open Purchase Orders and Goods Receipt POs. I choose only Operating Costs. Then I run the report (Execute). I choose level 5 displays the total for each account. Here, I can see the actual costs and the future costs for each account. I can see the remaining balance of the budget. On the right, I can see deviations from the defined Budget amounts. I can also view the difference in percentages.
The standard report company reports can also be displayed
along with the Budget data in:
Reports > Financials > Budget Reports: Balance Sheet, Trial Balance and Profit &
Loss statement.
Cost Accounting: Business Example
Imagine your company is divided to departments:
How can you issue a Profit and Loss report for department?
In this example, the Sales department brings in more revenues than the other departments. They also have a lot of expenses: travel, hotel, dinner, conferences, advertising, bonuses etc.
As the accountant of the company, how could you know the bottom line for each department?
How can you issue a Profit and Loss report for a department?
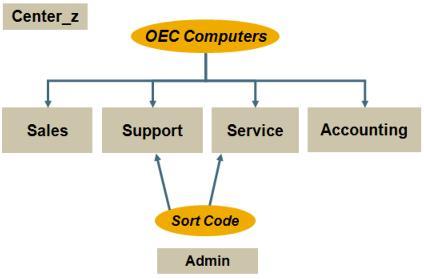
To use the const accounting functions in SAP Business One, you must define the Cost Centers of departments in your company as Profit centers. You can then compile a Profit and Loss statement for each Profit center in every period.
You can combine your Profit centers into groups by using a sort code.
The system automatically creates a Center zero profit center (Center_z) that collects the costs and revenues that cannot be clearly to another Profit centers because not enough information is available. The Center_z profit center can also record costs that are not to be reported in internal cost accounting.
For example, if you to show only 80% of your rental expenses as costs, you can assign the remaining 20% to Center_z.
The Center_z is used then defining distribution rules.
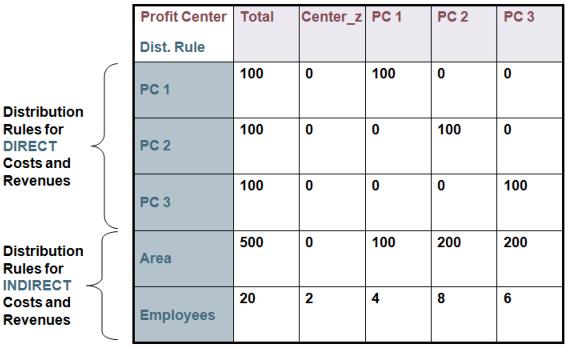
Distribution rules define how the costs or revenues posted to an account are distributed to the Profit centers.
When you create a profit center, the system automatically creates a distribution rule with the same name. This rule (which cannot be changed) is configured so that the system posts all the costs ore revenues to the relevant center. You can use these distribution rules for direct costs and revenues, which you can assign uniquely and in full to a specific Profit center.
For example, in OEC Computers, company car expenses are assigned directly to the "service" Profit center since only technicians hold a company car.
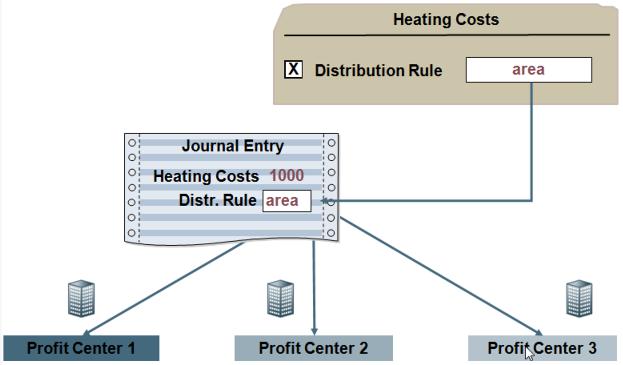
You allocate indirect costs and revenues to one or more Profit centers using a distribution rule. In the distribution rule, you specify how the amount is to be allocates amongst the Profit centers.
You can allocate by percentage or ratio, for example, you can distribute heating costs to the Profit centers in accordance with the size of the heated areas. Similarly, you can distribute voluntary employee benefits among the number of employees.
Link Between General Ledger and Cost Accounting
For costs to be included in Cost Accounting, you can either:
- Include a distribution rule in a Journal Entry row or a Marketing document row
or
- Post a Journal Entry or Marketing document to a G/L Account that linked to a
distribution rule.
You can only link accounts with the account type Sales or Expenditure in the Chart of Accounts.
You can use the Profit Center report to display an overview of the posted costs and Revenues.
You can produce some standard reports for a specific Profit center, for example, Profit and Loss statement, Trial Balance, and Budget Report.
Demo - working with Cost Accounting
Let us take a look at how you can work with Cost Accounting.
To use the Cost Accounting functions in SAP Business One, I must first define the Cost centers of Departments in the company as Profit centers. I can then compile a Profit and Loss statement for each Profit center in every period.
Financials > Cost Accounting > Profit Centers.
In this company I have already defined 2 Profit centers, for the HR and IT
Departments. I have given them the same sort code ADM so that they will appear
together in reports.
Let us define a new Profit center for the marketing department (switch to Add mode). I enter a profit center code: MKT and Name: Marketing. I choose Add.
The system automatically creates a zero Profit center - Center_z. Its collects the costs and Revenues that cannot be clearly distributed to other profit center. The Center Z is used when defining distribution rules.
I use distribution Rules in order to define how to costs or Revenues posted for an account are distributed to Profit centers.
Financials > Cost Accounting > Distribution Rules. When I create a profit center, the system automatically creates a distribution rule with the same name. I use these distribution rules for direct costs and Revenues, which I can assign uniquely and in full to a specific Profit center.
Note that the Direct Debit box is checked and the entire value is allocated to the relevant Profit center. I allocate indirect costs and Revenues to one or more Profit Centers using a distribution rule which I define. In this distribution rule, I specify now the amount is allocated amongst the Profit centers. Let us define a distribution rule to allocate electricity costs to Profit centers.
I switch to Add mode and enter a code: ElectCo and description: Electricity Costs. In the Total field I enter '150' to be used as the factor for the departments total space. In the table I enter the Cost center codes and their values. In the first row I enter the Center Code HR with a value of 20. Then, in the second row I enter the Center Code IT with value of 70 and the Center Code MKT I enter a value of 60.
IN case I cannot define the total allocation, for example if I do not have enough information about the Marketing cost center, the system allocates the unassigned costs or Revenues to the Center_z profit center. When I will have the information I need, I can change the distribution rule so that the system corrects the distribution accordingly.
Now, when the factor value is allocated, I choose Add to add the electricity costs distribution rule.
Financials > Cost Accounting > Table of Profit Centers and
Distribution Rules to display the Allocations for distribution rules.
To automate the Allocation of Revenues and expenses to the Cost centers in every
day work, I link the relevant accounts to a Distribution rule.
Financials > Chart of Accounts. I choose a suitable [60*] Expense Account. I check the Distribution Rule fox and choose the Electricity Costs distribution rule from the drop-down list. I save the settings by choosing Update.
Note that you can only link accounts with the account type Sales or Expenditure in the Chart of Accounts.
Now, whenever I post a Journal Entry or Marketing document to the Electric Company account the amount will be allocated the 3 Cost centers according to the Electricity Costs distribution rule.
Let us see an example.
Purchasing - A/P > A/P Invoice. I choose the Vendor 290000. I change the A/P
Invoice type to Service. I enter a Posting Date. I select Electricity
[605] Account
that I have linked to the electricity Costs distribution rule. I enter 200 as
the amount and Add the invoice.
Another way to allocate Revenues and Expenses to the Profit centers is to include a distribution rule in a Journal Entry row or marketing document row.
You can add the column by using Form Settings.
I can use the Profit Center report to display an overview of the posted costs and Revenues.
Financials > Cost Accounting > Profit Center Report. The Expenses column shows cost distribution based on the distribution rule. I can also produce some standard reports for a specific Profit center, for example, Profit and Loss Statement, Trial Balance, Budget Report.

You can use projects in SAP Business One to monitor your company's larger key projects and their economic succes. To do so, you first define projects in the system.
You can then enter these directly in the relevant line items or the Journal Entry or Marketing document.
You can also enter Projects in General Ledger accounts or Business Partners. The relevant Projects is then automatically entered in the documents you post to these accounts.
The Transaction Report by Projects lists all postings that you have made for a selected project. You can produce many standard reports for a specific project, for example, Profit and Loss Statement, Trial Balance, and Budget Report.
Accounting for Sales and Purchasing [Time: 28:18 min.]
We will cover some general accounting conventions and give examples of the automatic Journal Entries that are created during the sales, purchasing, and inventory processes.
We will also talk about some financial settings that affect these automatic Journal Entries.
You are implementing SAP Business One at a new customer:
Every business transactions is recorded in the company's books. This allows you: To manage your company effectively with the option of Producing financial reports and To report the business transactions to the authorities.
Every business transaction results with a value exchange: A certain account increases value and another decreases value, resulting in the recording of balancing Debit side and Credit side postings.
Automatic Journal Entries: Reflection Question
Sales Quotation > Sales Order > Delivery > A/R Invoice > Incoming payment > Deposit.
In previous topics we learned about the documents in the sales process and their consequences on bookkeeping.
To review this process let us try to answer the following
question:
In a standard sales process which documents affect the accounting system?
Automatic Journal Entries: Answer
These are the documents in the sales process that create automatic
Journal
Entries and hence affect the accounting system:
- Delivery (only for Perpetual Inventory)
- A/R Invoice
- Incoming Payment
- Deposit (only for Perpetual Inventory)
Sales Quotation > Sales Order > Delivery > A/R Invoice
In SAP Business One, a Journal Entry is automatically posted for many documents during the sales, purchasing and inventory processes.
Now let us assume for a moment that we are in a non-Perpetual Inventory system in order to keep our example simple. In that case, in our sales process example, the A/R Invoice automatically creates the following Journal Entry: These is a Debit to the [411] Customer Account for the total price of the sale. There is a credit to the tax account for sales tax and a Credit to the Revenue account for the sales price (excluding tax).
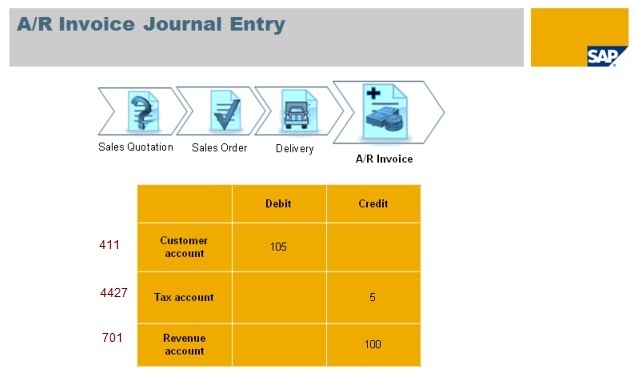
Debit Credit
Customer account [411] 105
Tax account [4427]
5
Revenue account [701]
100
Let us focus on Debit side. Each transaction registered for the Customer affects the [411] Customer Account balances.
The account balances represents the difference between the total Debit transactions and the Total Credit transactions recorded for that account.
The transaction summary or the balance of a certain G/L account or Business Partner is the initial information the accounting system can provide about the business.
Previously, we mentioned that in each Journal Entry a certain account increases value and another decreases value, resulting in the recording of balancing Debit side and Credit side postings.
The effect on the account balance:
Assets, Expenses, and Drawings accounts are generally in Debit.
Liability, Revenue, and Capital (Equity) accounts are generally in Credit.
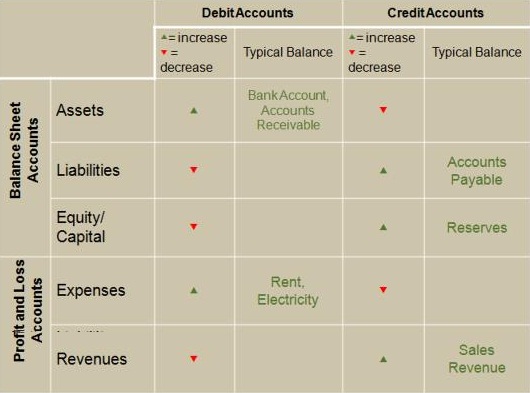
Here, we see the typical account balance of the different account types. For example, let us look at the value exchange for assets liabilities.
------------
... in non-Perpetual Inventory system ... the A/R Invoice automatically creates
the following Journal Entry:
There is a Debit to the Customer Account [14000 / 411
Trade Debtors (domestic)] for the total price of the sale (total
invoice value).
There is a Credit to the Revenue Account [400000 / 701
Sales Revenue (Domestic) - Product No.1] for the sales price (excluding tax) and
a Credit to the Tax account for sales tax [207000 / 4427
VAT Payable (output Tax)].
Each transaction registered for the customer affects the [411] Customer Account balance.
The account balance represents the difference between the total debit transactions and the total credit trasactions recorded for that account.
Assets, Expenses, and Drawings account are generally in Debit.
Liability, Revenue, and Capital (Equity) accounts are generally in Credit.
-------------
For Assets:
Debit transactions always increase the asset value.
Credit transactions always decrease the asset value.
For Liabilities:
Credit transactions always increase the liability.
Debit transactions always decrease the liability.
In a typical A/R Invoice, what is the effect of the Debit and Credit amounts on the involved account balances?
Debit Credit
Customer account [411] 440
Revenue account [701]
440
The two accounts increase their values.
The [411] Customer Account is considered an asset so any Debit to this account
increases the account value.
A credit to the Revenue Account, as we saw on the previous slide, increases the
account's value.
In the Journal Entries that automatically posted by documents in SAP Business
One, how does the system "know" witch accounts to use?
The system knows which accounts to use because when you initialize SAP Business
One, you define default G/L Accounts related to specific business process in the
G/L Accounts Determination window. In this window, you also define Control
Accounts that link Business Partner sub-ledger accounts to the General Ledger.
First let us review how accounts are determined for items used in Business process.
As we mentioned, when you first implement SAP Business One you define default G/L Account to be used when transactions are created during the different business process, such as sales, purchasing and inventory.
When items are used in the transactions, the system looks for the default accounts based on the account determination set in the Item Master Data.
In the system, there are three options to define a default G/L method for an item: warehouse level, Item Group level, and item level. You make these settings at the company level, but can override it in the Item Master Data.
Default G/L method item at the:
- Warehouse level
- Item Group level
- Item Level,
but can override in the Item Master Data.
The values that you define under the labs in the G/L Account
Determination windows are defaulted into all 3 levels.
You can then change the default accounts for any of the levels. For example, you
can manage different inventory accounts for finished goods versus raw or
material or base the accounts used on the location of the item. Whenever you add
a document that posts a Journal Entry,
A/R Invoice for example, the system determines the level at which to look based on the items in the document and then determines which G/L Accounts are to be used from the default accounts.
It is very important ensure you make decisions about G/L Account Determination together with the client accountant.
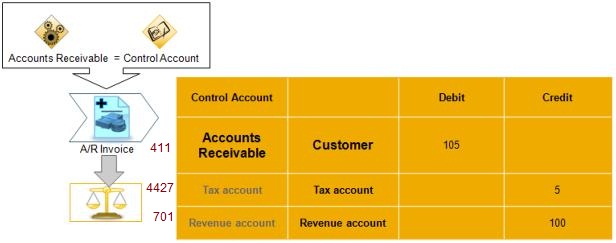
In the G/L Account Determination window you also define the Control accounts:
- [411] Accounts Receivable for the Sales process,
- Accounts Payable for the Purchasing process
A control account links the Business Partner sub-ledger accounts to the General Ledger. You need to define a G/L Account as a Control Account in the Chart of Accounts.
Whenever you post a document to a Business Partner, the system automatically
register the Journal Entry to:
- The Business Partner Master Data account balance
- The Control account balances.
You cannot post Journal Entries directly to a Control account.
In an A/R Invoice, for example, when the customer is Debited the [411] Accounts Receivable account is also Debited.
This Journal Entry appears now in both accounts balances (the customer and control account).
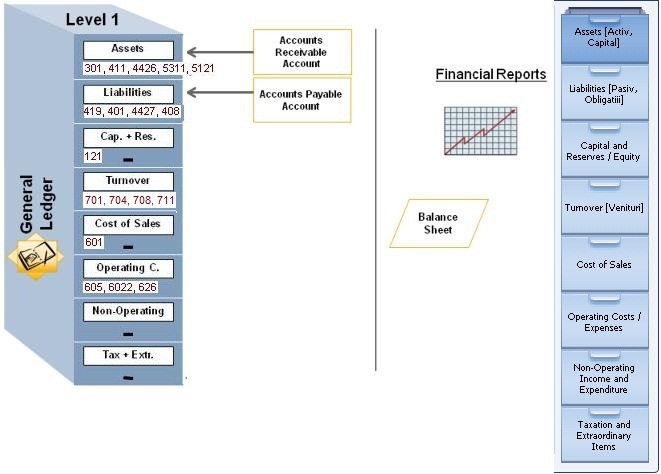
[411]
Account Receivable > Assets
[401]
Account Payable > Liabilities
Note, that the Business Partner Master Data balances do not appear in the Chart of accounts. Only the [411] receivable and [401] Payable control accounts appear.
The receivable and payable control account accumulate the customers and Vendors transactions in their balances.
Therefore, the Chart of Accounts presents the complete financial status of the company.
For example, the Balance Sheet contains the [411] Accounts Receivable and [401] Accounts Payable accounts.
Demo - G/L Account Determination
In this demo we will review the G/L Account Determination window where default
G/L Accounts are related to a specific business process:
Administration > Setup > Financials > G/L Account Determination.
The window is divided into 4 tabs. Each tab contains the definitions for G/L
Accounts related to a specific business process:
Sales, Purchasing, General, and Inventory.
On the Sales tab, two key accounts: [701] Revenue Account and the [667] Cash Discount Account.
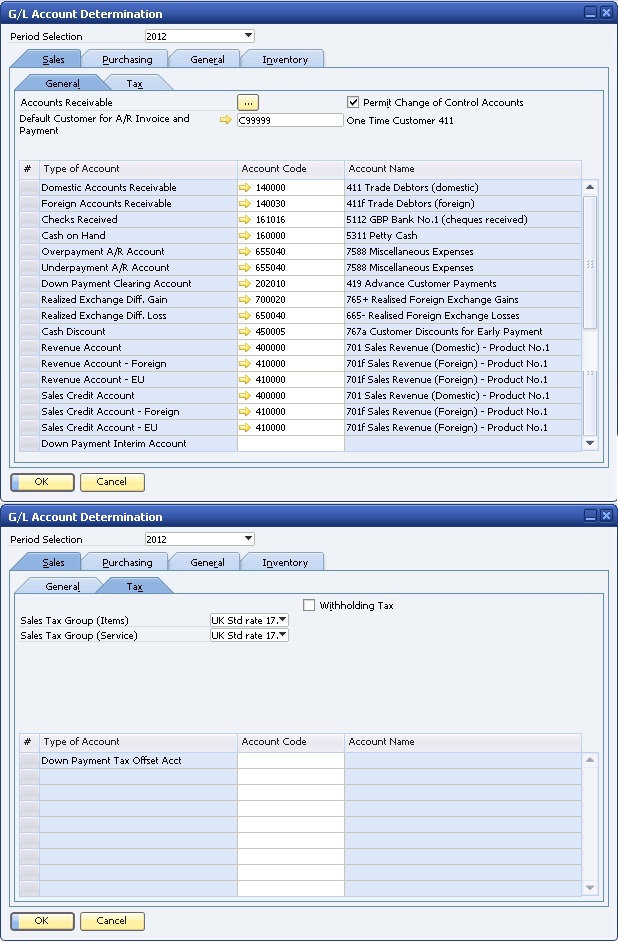
When I choose a pre-defined Chart of Accounts template, most of the defaults are already defined. I can change them if required.
On the Purchasing tab: Bank Transfer account and the [60*] Expense Account.
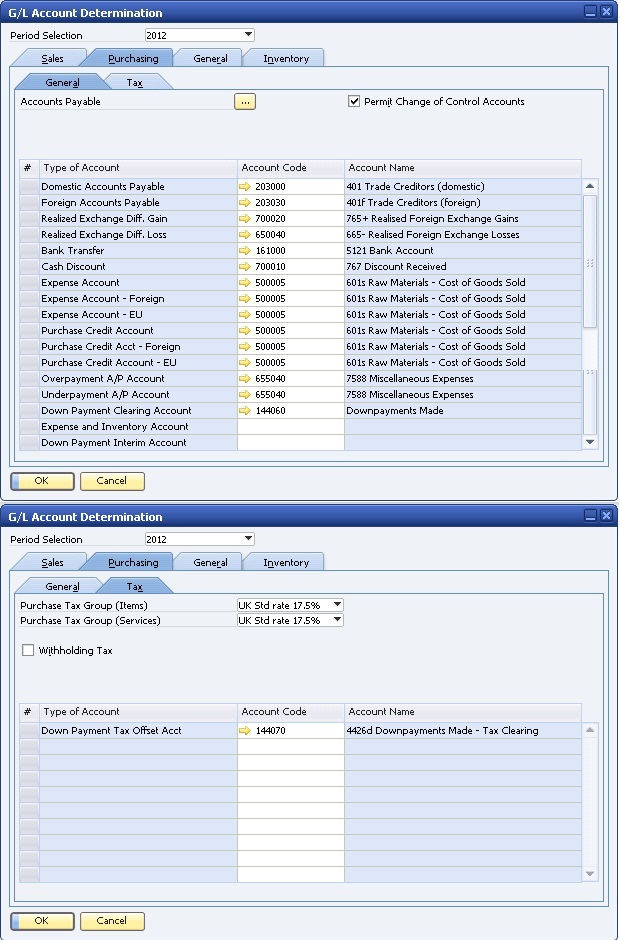
These accounts are used in automatic Journal Entries during the purchasing process.
In the General tab, define a default G/L Account for the Period-End Closing process.
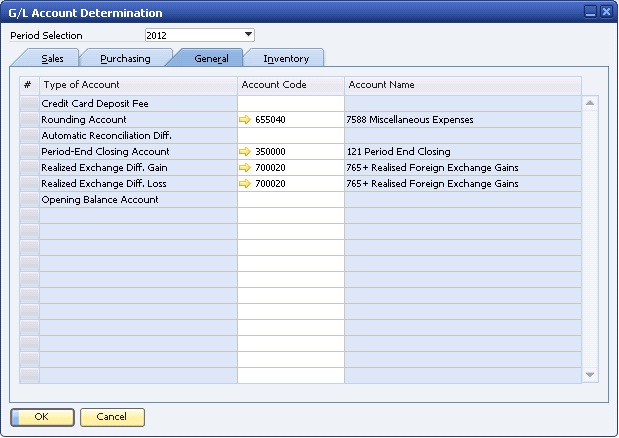
For activate Inventory tab go to Administration > System Initialization > Company Details > Use Perpetual Inventory
In Inventory tab, you define the default accounts for the Perpetual Inventory process.
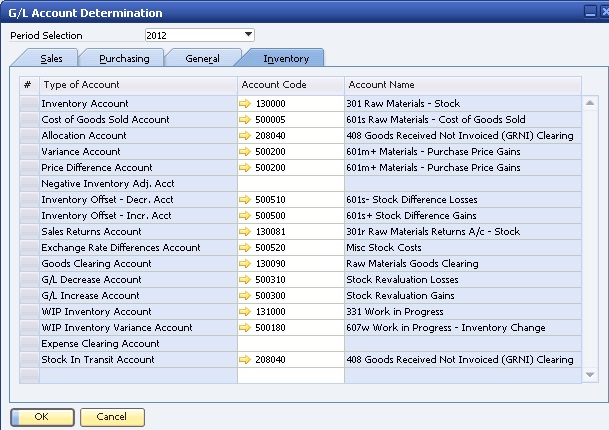
When choosing a G/L Account appears in green in the Char of Accounts.
Whenever I add a document that posts a Journal Entry, A/R Invoice for example, the system determines the G/L Accounts to be used from the default.
Sales - A/R > A/R Invoice
The Revenue default G/L Account is defined in the item included in the A/R
Invoice.
Inventory > Inventory Master Data: Inventory Data tab is Revenue Account (for each warehouse)
In SAP Business One, there are 3 options to define a default G/L method for an item: Warehouse, Item Group and Item level. [Set G/L Accounts By]
The initial values in all 3 levels are defaulted from the values defined in the G/L Account Determination window.
In this company the default method is by Warehouse. When I browse to the item releasing warehouse, I see the warehouse revenue account.
This account value was initially defaulted from the revenue account defined in the G/L Account Determination window on the Sales tab. If necessary, I can change the warehouse default accounts. This will affect the items relating to the Warehouse.
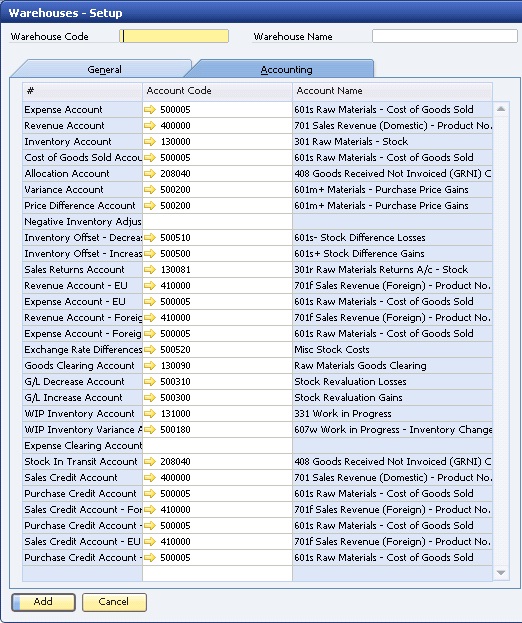
Control Accounts: In the G/L Account Determination widow you also define the Control Accounts: [411] Accounts Receivable for the Sales process, Accounts Payable for the Purchasing process.
[411]
Account Receivable
[401]
Account Payable
For these accounts you can only choose accounts defined as a control account in
the Chart of Account [Control Account is Enabled]
Imagine you have just added an A/P Invoice received from one of your vendors. I add the control account column to the Journal Entry display.
You can see that the system automatically register the document Journal Entry to the Business Partner Master Data account as well as to the Account Payable account.
When I choose the linking arrow to open the control account and then control account balances.
Administration > Setup > Financials > G/L Account Determination > General tab: Permit Change of Control Accounts
In the G/L Account Determination window I can decide if I want to assign different control accounts to different customers or vendors [Permit Change of Control Accounts is Enabled]. If the option is selected, I can assign control accounts to each customer or vendor in the Business Partner Master Data window.
Business Partners > Business Partner Master Data > Accounting tab > General tab > Accounts Receivable / Accounts Payable field.
If this option is not selected, the control accounts defined in the G/L Account Determination window are used for all customers and vendors.
I also have the ability to change the default control account in marketing documents.
[In A/R or A/P Invoice Under] Under the Accounting tab, I can choose a different Control account [411 / 401].
If I work with several control accounts, the system allows me to display the
Business Partner balances separately for every Control account.
Business Partners > Business Partner Master Data > Account Balance > View by
Control account button.
The effect of Control accounts on the Chart of Accounts and the Financial
reports.
The Business Partner Master Data balances do not appear in the Chart of
Accounts. [Liabilities: 203000 - 401 Trade Creditors
(domestic)]
This way, the Chart of Accounts presents the company financial status of the company. [Assets: 140000 - 411 Trade Debtors (domestic)]
The same goes for the Financial Reports: [121] Profit and Loss and the Balance Sheet.
Debit Credit
Customer account [411] 440
Revenue account [701]
440
We have learned how the system "knows" which accounts to use in automatic Journal Entries. This is done using the values defined in the G/L Accounts Determination window. But, how does the system "know" the value to be credited and Debited in those automatic Journal Entries? For example, an automatic Journal Entry created by an A/R Invoice?
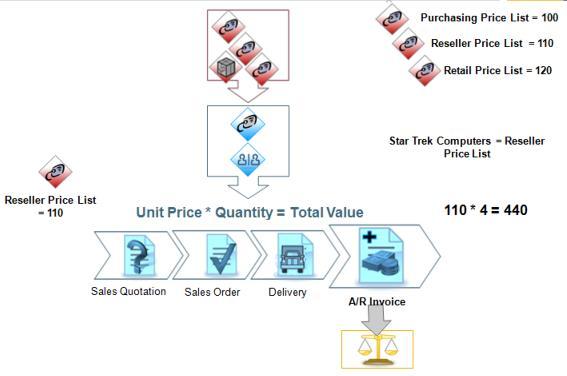
Let us refresh our memory with some of the topics we learned before.
Here is a common scenario of how prices are set in SAP Business One during the sales process: Our customer Star Trek Computers asks for an offer on 4 portable media player. Jean creates a Sales quotation. She choose the customer and then the item. The price per unit appears in the quotation. How?
The Item Master Data includes 3 optional prices for this item. Each one of them is represented in a different Price List. For a reseller customer and so his default Price List as defined in his Master Data Record is the Reseller Price List.
Business Partner Master Data > Payment Terms > Price List
Therefore, in the Sales quotation, the unit price for a portable media player is 110, the Resellers Price List.
Jean enter quantity of 4. The Total value of the quotation is 440 (assuming there are no additional items in the quotation and that no discount, freight charges or tax amounts are added).
Star Trek Computers faxes us a Sales Order based on the Sales quotation. In SAP Business One, Jean copies the Sales Quotation to a Sales Order. 2 days later, Joe, the warehouse manager, dispatches the company truck with weekly deliveries, including 4 portable media players for Star Trek Computers. Later on the day, the accountant copies the Delivery to an A/R Invoice. Since no change was done to the price during the Copy to process, the Invoice total value is 440 and these are the Credit and Debit amounts in the automatic Journal Entry created by the A/R Invoice.
Sales Quotation [no discount, freight charges or tax amount], Copy to > Sales Order, Copy to > Delivery, Copy to > A/R Invoice [created automatic Journal Entry].
Purchase Order [no discount, freight charges or tax amounts are added], Copy to > Good Receipt PO, Copy to > A/P Invoice [created automatic Journal Entry].
Value Calculation - Purchasing
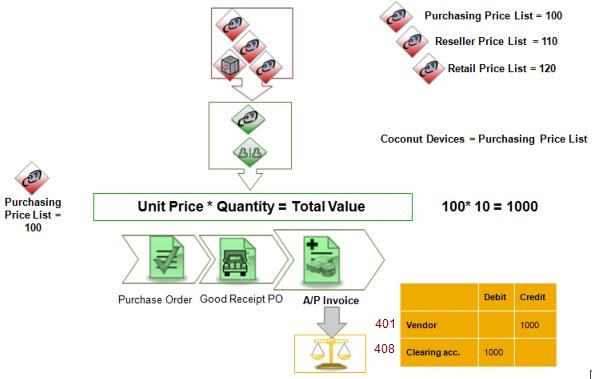
In the Purchasing process a common scenario of how prices are set would be: Joe, the warehouse manager, issues a Purchase Order of 10 portable media players. He choose the vendor Coconut Devices and then the item - portable media player. The price per unit appears in the Purchase Order. How?
Since Coconut Devices is a vendor, his default Price List as defined in his Master Data Record is the Purchasing Price List. Therefore, in the Purchase Order, the unit price for portable media player is 100, the Purchasing Price List from the portable media player Item Master Data. Joe enters a quantity of 10. The total value of the Purchase Order is 1000 (assuming there are no additional items in the Purchase Order and that no discount, freight charges or tax amounts are added). Joe e-mails the Purchase Order to the vendor. Few days later Joe receives a Delivery including 10 portable media players from Coconut Devices.
In SAP Business One, he copies the Purchase Order to a Goods Receipt PO.
A week later, the Invoice from Coconut Devices arrives via mail and the accountant copy the Goods Receipt PO to an A/P Invoice. Since no change was done the price during the Copy To process, the A/P Invoice total value is 1000 and these are the Credit and Debit amounts in the automatic Journal Entry created by the A/P Invoice.
Default list as defined in his Master Data record in the Purchasing Price List.
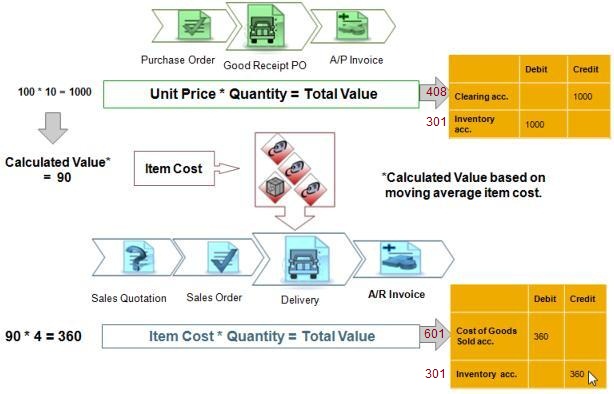
Let us go one step back, to the Goods Receipt PO that entered based on the Delivery he got from the vendor.
Assuming the company runs Perpetual Inventory, an item cost value is being calculated automatically in each transaction.
When Joe entered the Goods Receipt PO to SAP Business One, the Purchasing Price List value (100 per unit) affected the unit price in the Goods Receipt PO and also the item cost value. The item cost value is calculated automatically, behind the scenes according to the valuation method chosen for the item (Moving Average, FIFO, or Standard).
This particular item was set up as Moving Average, so based on the total number of items in stock and the purchase prices previously paid, the calculated item cost value after Goods Receipt PO was 90. Joe entered a quantity of 10 portable media players. Therefore, the total value of the Journal Entry created by the Goods Receipt PO was 1000 and these are the Credit and Debit amounts registered to the inventory default accounts. However, the value of the Journal Entry linked to the Delivery sent to the customer is 360. That is, quantity of 4 items multiplied by the Item Cost value at that moment (90). Remember that the total value of the Invoice based on that Delivery was 440. It was calculated according to the Reseller Price List (110) that is defined as the default Price List in the Customer Master Data record.
Cost a Goods Sold Account is Debited [500005 / 601s
Raw Materials - Cost of Goods Sold]
Inventory Account is Credited [130000 / 301 Raw
Materials]
More details on Perpetual Inventory will be provided in a separate e-learning.
Good Receipt PO, the Purchasing Price List value affected the unit price and also Item Cost value. The Item Cost value is calculated automatically, behind in scenes, according to the valuation method chosen for the item (Moving Average, FIFO, or Standard). Moving Average, so based on the total number of items in stock and the purchase prices previously paid ...
Demo - Automatic Journal Entry Values
We will demonstrate how the default unit price is determined in the Goods Receipt PO and how it affects the values of the automatic Journal Entry.
Business Partners > Business Partner Master Data > Payment Terms > Price List:
Purchasing Price for Vendor
Business Partners > Business Partner Master Data > Payment Terms > Price List:
Sales Price for Customer
Inventory > Item Master Data > Price List: Purchasing Price, Unit Price.
I open a Goods Receipt PO that the warehouse manager entered based on a Delivery he got from the Vendor. Unit price in the Goods Receipt PO is 100. Let us see how this price is determined: The default Price List for this vendor is the Purchase Price List. We have set the price for his item in the purchasing price list to be 100.
When Joe entered the Purchase Order, the value from Purchasing Price List defaulted into the order and "100" was set as the unit price. Then when Joe entered the Goods Receipt PO, the price was copied from the Purchase Order to the Goods Receipt PO.
Now let us look at the automatic Journal Entry created by Goods Receipt PO. A quantity of 10 was multiplied by the unit price of 100 and the total value of 1000 credited the [408] Clearing Account and Debited the [301] Inventory account. Remember that these are the item inventory default accounts. When you working with a Perpetual Inventory system, the item cost is calculated automatically, behind the scene, according to the valuation method chosen for the item - Moving Average, FIFO, or standard. In the portable media player it is Moving Average.
The unit price of 100 in the Goods Receipt PO affected the calculation of the Item cost value. The previous stock value was 800 based on 10 items with the unit price of 80 each.
Debit Credit
130000 [301] Raw Materials - Stock
800
(10 x 80)
208040 [408] Goods Received Not Invoiced (GRNI) Clearing
800
In Goods Receipt PO > Copy to: A/P Invoice
Debit Credit
V2220 Coconut Devices [401]
940
[4426] VAT Receivable (Input Tax)
140
[408] Goods Received Not Invoiced (GRNI) Clearing
800
Now let me show you the values of a Delivery I issue for one of our customers. When I choose the Portable Media Player item for the customer a unit price of 110 appears. This is because we defined the Reseller Price List as the default Price List for this customer. I enter a quantity of 4 and add the Delivery.
I browse back to the Delivery and I can see that the Total value of the Delivery is 440. The value of the Journal Entry linked to the Delivery is 360. That is, quantity of 4 items multiplied by Item cost value at that moment - 90.
Debit Credit
500005 [601] Raw Materials - Cost of Goods Sold
360
(4 x 90)
130000 [301] Raw Materials - Stock
360
Banking > Outgoing Payments > Outgoing Payments:
Debit Credit
V2220 Coconut Devices [401]
940
161000 5121 Bank Account
940
In Delivery we defined the Reseller price List as the default Price List for
this customer.
13000 / 301 Raw Materials account is Credited and
500005 / 601s Raw Materials - Cost of Goods Sold is
Debited.
In Delivery > Coy to: A/R Invoice
When I create the Invoice for the Customer Order, we see that although the item
cost is 360, the customer is changed a price of 440 based on the customer's
Price List.
Debit Credit
C20000 [411]
Norm Thompson [411]
515.46
207000 [4427] VAT Payable (Output Tax)
75.46
400000 [701] Sales Revenue (Domestic) - Product No.1
440
Banking > Incoming Payments > Incoming Payments:
Debit Credit
160000 5311 Petty Cash
506.66
450005 767 Customer Discounts for Early Payment
8.80
C20000 411 Norm Thompson 411
515.46
[411] Customer Account =
411 Clienti
Revenue account = Clasa 7 - Conturi de venituri
[701] Sales of fished goods = 701
Venituri din vânzarea produselor finite
[4427] Output VAT = 4427 TVA colectată
Inregistrarea vanzarii catre clienti
411
=
%
136’850
411 - Clienti [Customer Account]
701
115’000
701 -
Venituri din
vanzarea produselor finite
[Revenue
account]
4427
24’850
4427 -
TVA colectata
(clienti) [Tax account]
Se incaseaza
in numerar 21’850 si diferenta prin cont bancar.
%
=
411
136’850
411 – Clienti [Customer Account]
5311
21’850
5311
-
Casa in Lei [Incoming Payment]]
5121
115’000
5121 - Conturi
curente la banci in lei [Incoming Payment]
Accounting for Inventory [Time: 33:40 min.]
In this topic we will discuss how to define a Perpetual Inventory or Non-Perpetual Inventory system in the implementation process.
Note that you need to make decisions about these definitions together with the client accountant.
You discuss the inventory system definition with the company accountant:
Perpetual or Non-Perpetual Inventory
Two choices for defining inventory valuation:
Perpetual Inventory system
- Inventory transactions affect stock levels and value
- Automatic entries created in the General Ledger
Or:
Non-Perpetual Inventory system
- Automatic inventory transactions affect only inventory levels
- No affect stock value
- No automatic entries in the General Ledger.
 When you set up SAP Business One, you need to define
how to control the Inventory valuation according to local legal settings.
When you set up SAP Business One, you need to define
how to control the Inventory valuation according to local legal settings.
You have two choices for
defining inventory valuation:
- Perpetual Inventory system that automatically controls both stock levels and
stock value and affects the financial system by creating automatic Journal
Entries in the General Ledger. A Perpetual Inventory sistem reflects the value
of inventory postings in terms of monetary transactions in the accounting
system. These monetary transactions are carried out when items defined as
inventory items are received or released from stock;
- non-perpetual system in which sales, purchasing, inventory, and production
transactions automatically create transactions which affect the inventory levels
and have no affect on the stock value. ... do not generate inventory related
monetary entries directly into the General Ledger.
However, it is possible to get an estimate of inventory value using different
inventory reports.
Perpetual Inventory System - Example for Monetary value Inventory Postings
When you use a Perpetual Inventory system, the monetary value of inventory postings is automatically calculated and posted to the General Ledger accounts. Let us look at a graphic example of how this works.
Here we see that an inventory item is linked to an inventory account that has a certain value from previous transactions for this item.
As you purchase this item,
the balance if the inventory account increases [301
Raw materials].
When you sell this item, the balance of the inventory account decreases.
Note: You should define a Perpetual Inventory system during basic initialization, before posting any transactions.
[For activate Inventory tab go to Administration > System Initialization >
Company Details > Use Perpetual Inventory]
If a Perpetual Inventory system is selected, each transaction of inventory items
is also reflected in the inventory related G/L Accounts.
After the first inventory transaction is posted, the option to choose either
perpetual or no-Perpetual Inventory is disabled, and its status cannot be
changed.
Set G/L Account by Item Level
WH Code WH Name Accounts Type
01
General Warehouse \
02 Drop
Shipment | Account Entered
Manually
03
Consignation /
Set G/L Account by Item Warehouse
WH Code WH Name Accounts Type
01
General Warehouse \
02 Drop
Shipment | Account from
Warehouse Definition
03
Consignation /
Set G/L Account by Item Group
WH Code WH Name Accounts Type
01
General Warehouse \
02 Drop
Shipment | Account from Item
Group Definition
03
Consignation /
In the Item Master Data you define the G/L Accounts
to be involved in the monetary transactions:
To simplify the account
determination, in every Item Master Record you can specify that the accounts are
retrieved from a higher level.
You have tree options:
- Item Level - to define manually any G/L Accounts at the item level;
- Warehouse level to automatically retrieve the accounts from the warehouse
definition;
- Item Group Level to automatically retrieve the accounts from Item Group
definition.
When you initialize the system you choose the default G/L method for new items. The default account values for all levels (warehouse level, item group level, and item level) are defaulted from the G/L Account Determination window.
SAP Business One provides the following three valuation methods for calculating
the inventory value:
- Moving Average
- Standard Cost
- FIFO
The Moving Average valuation method calculates the average cost for the item in
each sales, purchasing, inventory, and production transaction.
FIFO stands for First In, First Out. This valuation method calculates the
inventory value by first in first out method. This means that goods purchased
first (or produced first) are sold first, regardless of he actual goods flow.
Each inventory receipt transaction creates a layer of quantities linked to
costs. A FIFO layer is defined as the quantity of an item in a warehouse with a
particular cost value. Each inventory release transactions uses quantities and
their corresponding costs from the first open layer or layers.
The standard cost valuation method calculates the inventory value by a fixed price, which is then for all transactions.
When setting up the system you can: Set default valuation method per Item Group.
An item you assign to this group will automatically receive this valuation
method. You can override the default valuation method in the item master.
[Administration >
System Initialization > Company Details:
Basic Initialization tab: Item Group Valuation Method (Moving Average,
Standard, FIFO)]
You specify the default valuation method for newly added Item Groups.
And define whether the system calculates one inventory pricing for all warehouse
or a separate inventory pricing for each warehouse.
[Administration >
System Initialization > Company Details:
Basic Initialization tab: Manage Item Cost per
Warehouse]
Demo Inventory Accounts
When you set up a company database, you need to decide whether to activate the
Perpetual Inventory system.
Activate Perpetual Inventory and define default inventory accounts:
Administration >
System Initialization > Company Details: Basic Initialization tab, we can select
to use Perpetual Inventory Checkbox.
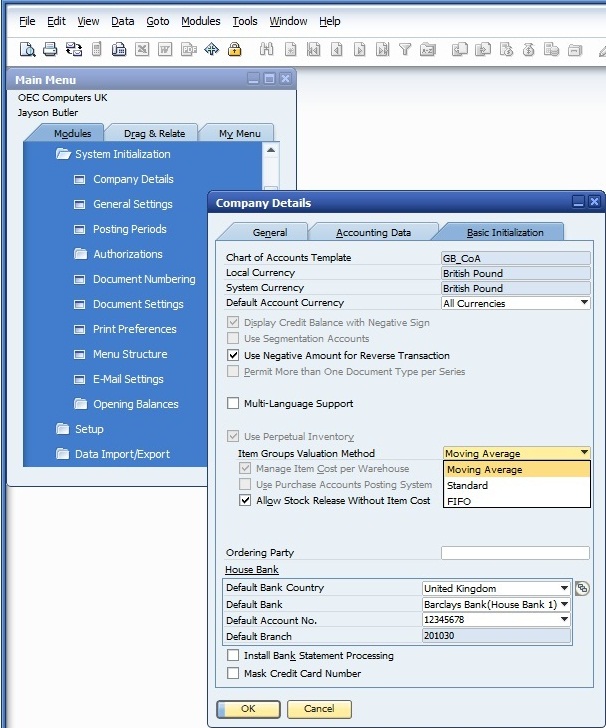
Once this done, we need to select the default valuation method for new item groups. We choose one of the 3 methods.
Then we can decide whether to manage the item cost by Warehouse. If we do not select this option, then the cost will be maintained per item for all warehouses.
If you require valuation reports by Warehouse, we recomand maintaining cost by Warehouse whether you have different costs in different warehouses or not.
You can also allow Stock release without a cost, however, this is generally not recommended.
As you can see it is still possible to change the default valuation method for new items, but it is not possible to turn on or off the Perpetual Inventory system once there is activity in the company.
Administration > Setup > Financials > G/L Account Determination, on the Inventory tab, we can define all the default accounts on the company level. Here you we review some of the main accounts used in accounting. First, we see the Inventory account. This is the main account that reflects the inventory value. When the item is purchased, this account will be on debit side of the journal entry. Later, when you sell the item, this account will be on the credit side.
Another important account is the [601s] Cost of Goods Sold Account which reflects the cost of the items that were sold in the sales document.
The [408] Allocation Account represents all received items that have not yet been invoiced by the vendor [408 Goods Receipt Not Invoiced (GRNI) Clearing]
The Variance Account is used for the standard costing method to record differences between the unit's standard cost and the actual purchase price.
The Inventory Offset decrease and increase accounts record any stock adjustment that are posted by Goods Issue or Goods Receipt documents.
[345] Sales Return Account [= Stock Account] will allow you to post any returned items to a separate account rather than this items back to the main Inventory account.
A G/L decrease or increase account is used if you perform inventory revaluation. The revaluation amount is posted to the G/L decrease or increase account.
There are additional accounts that need to be defined as well. See the how to guide for more information.
The accounts on this tab serve as default for new Item Groups and warehouse you create.
Administration > Setup > Inventory > Item Group, and look at the Accounting tab. We see these same accounts defaulted in. Here you make changes to the accounts for particular Item Group.
Administration > Setup > Inventory > Warehouse, you see the same list of default accounts.

The default level for accounting is set in the menu:
Administration > System
Initialization > General Settings > Inventory tab - Set G/L Account By for
the G/L Account method:
- Warehouse
- Item Group
- Item Level
This can be changed at any point in time. The change, however, will only affect new item creation.
Inventory > Item Master Data: In the master, on the Inventory data tab, we can override the default G/L method as well as the default valuation method.
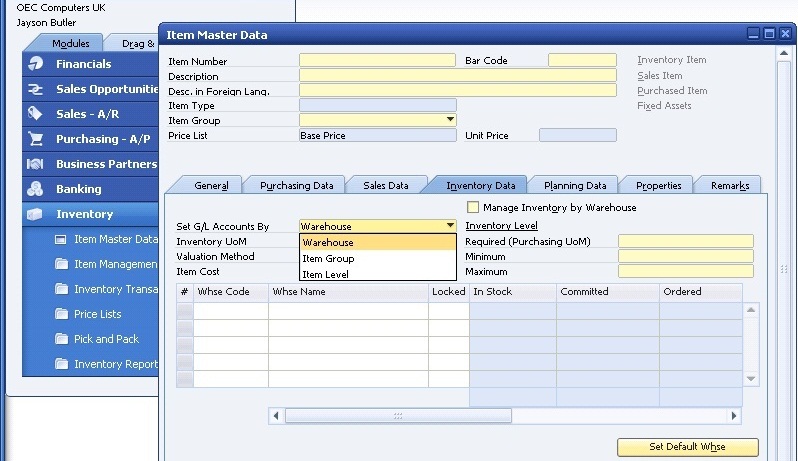
If I go into Add mode, we can see the default G/L method and valuation method for that Item Group. If I go the right, we can see the list of accounts. These accounts have defaulted in.
Only in the G/L Account level is set to "item", will I be able to change the accounts at the item level.
Occasionally a company may decide to change the valuation method of their items.
Use the Inventory Valuation Method tool, located on the Inventory menu, under item management, to determine a new valuation method for your items.
Inventory > Item Management > Inventory Valuation Method
Please note that you can only update items with no "on hand quantity" and witch are not listed on any open documents.
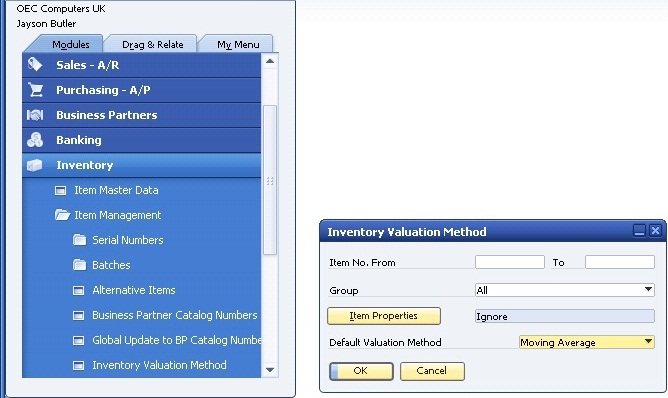
In the Moving Average method the item cost is calculated by dividing the total inventory value by the on-hand quantity.
So after purchasing 5 units twice, the first time for a price of 100 each and the second for 200 each, the quantity in stock is 10 and the inventory value is 1500. The item cost is set to 150, that is 1500 divided by the quantity of 10.
When selling 7 items with the cost of 150, the total [601s] Cost of goods sold is calculated as 7 multiplied by 150, that is 1050.
The inventory value is now 1500 minus 1050 resulting in the new inventory value 450. If you divide 450 by the remaining quantity of 3 you will get the unit cost of 150.
You have seen the Moving Average method and its consequences in the topics for Logistics.
In the FIFO method, the item cost is managed by layers for each item.
Each inventory receipt transaction creates a "layer" of quantity linked to costs. Each inventory release transaction uses quantities an their corresponding costs from the first open layer.
So in our example, again after purchasing 5 units twice, the first time for a price of 100 each and the second time for 200 each, the quantity in stock is 10. The inventory value is 1500.
When we sell 7 items, 5 of them are released with the cost of the first layer, that is 100 and the remaining 2 are released with a cost 200, the cost of the second open layer.
The total [601s] Cost of goods sold is calculated as 5 multiplied by 100 that is 500, plus 2 multiplied by 200 that is 400 for a total of 900.
When subtracting the 900 total [601s] Cost of goods sold from 1500, we get the new inventory value of 600.
Please note that we do not have one general item cost for the Item Master Data like in the other valuation methods, because as the item cost is managed by layers for each item.
There is no cost entered, because the cost is calculated dynamically based on stock postings.
Purchasing - A/P > Good Receipt PO
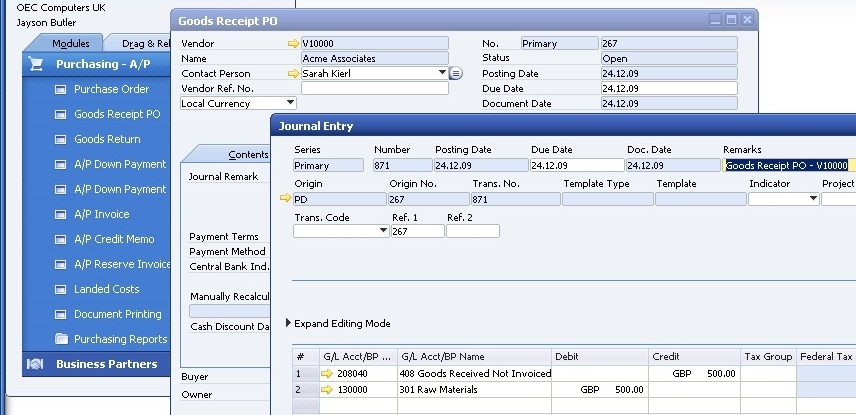
When I return to this document, and open the Journal Entry, I see a Credit to the allocation account for Goods Received but not invoiced. And I see in Debit to the Warehouse account for 500 the 5 items.
A layer has been created in the system for this purchase. When these 5 units are sold, the [601s] Cost of goods sold for each one will be 100.
In the Goods Receipt PO choose duplicate from context menu [right click mouse]. I enter same vendor.
A second layer has been created for this second purchase. The cost of Goods sold for this layer will be 200.
Sales A/R > Delivery
... Quantity of 7, Sales Price to 300
In a Database: OITM.EvalSystem = A - Moving Average; S - Standard; F - FIFO
OITM.GLMethod = W - Warehouse; C - Item Group; L -
Item Level
If I go to the item [in Delivery], click Item Master Data, I can right click and open Inventory Posting List.
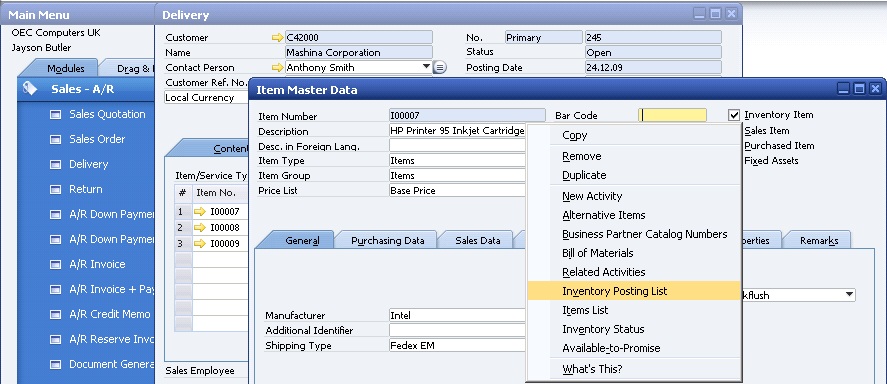
This is quick and useful report that shows me all the activity for a certain item. Here I can see the document, warehouse, account used, quantity and the price in the transaction.
Standard Cost - Example
The standard cost
valuation method assumes a constat stock value, regardless of the purchase
price.
With the standard cost method, the unit cost is determined manually when you setup the item. Variances that occur due to a different purchase price are recorded to a Variance Account, and the unit cost is not affected.
So, in our example, the unit cost is set to 100 and after purchasing 5 units twice, the first time for a price of 100 each and the second for 200 each, the quantity in stock is 10. The inventory value is 1000 as we do not consider the different purchasing price of 200. We simply multiply the quantity of 10 by the standard cost of 100.
The delta cost in the second purchasing transaction is registered to a variance account.
The inventory value after the sales transactions is also set by the fixed unit cost of 100. The 7 units sold are multiply by 100 for a total [601s] Cost of goods sold of 700.
When subtracting this 700 total [601s] Cost of goods sold from the inventory value of 1000, you get 300 as the new inventory value.
Stock Movements with Standard Price
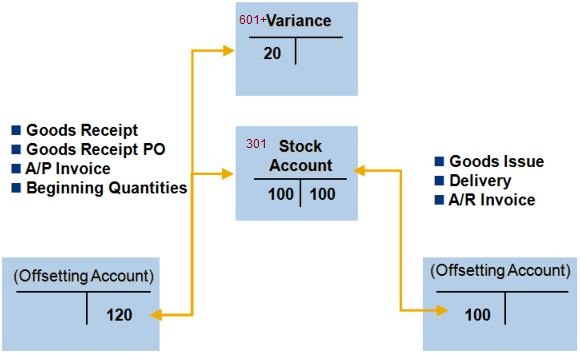
As we discussed previously, if an item is managed with Atandard Price valuation, a Variance Account is needed when posting any kind of Goods Receipt (Goods Receipt without reference, Goods Receipt PO, A/P Invoice, beginning quantity). The Variance Account Receives the price difference between the Standard Price and the price in the document. The Variance Account is retrieved from the Variance Account field on the Inventory tab of the Item Master Record.
Here is a graphic look at what happens when you receive an item with a standard price. In this example, the value of the item when is 120. However, out item's standard price is set at 100.
The Journal Entry will post the amount of 120 to the appropriate account depending on the type of transaction used - here we have labeled it as offsetting account.
Since the Standard Price is 100, 100 is posted to the Stock Account for the one unit purchased. The difference of 20 is posted to the Variance Account. No matter what the actual cost of the item was initially, the unit value of item in the Stock Account is always equal to the Standard Price. In this case, the unit price of 100.
Therefore, when the item is issued out of the warehouse, on a Goods Issue,
Delivery or A/R Invoice, the [601s] Cost of Goods Sold for each unit will always be the
same as the Standard Price, in this example 100.
Demo - Standard Cost
This
item is controlled by the Standard Cost valuation method. Notice the cost price
field.
When using the standard cost method, you set the value of the
item manually. Here [Item Cost field] set item cost to 100. It is important to
enter a standard cost. Otherwise, then you purchase the item, the amount will be
recorded in the Variance Account rather than inventory account. When I set
price, the system asks me if I want to update the price for all the warehouses.
It is possible to change the standard cost in each warehouse before postings
have been created in case you have set the company to manage item cost by
Warehouse.
I create a Goods Receipt PO with a vendor who is tax exempt, to keep the example simple.
I return to the document and choose Duplicate from the context menu to create a second Goods Receipt PO.
For Delivery the price was when I bought the item, the standard cost remains unchanged.
Generating Inventory audit Report:
The Inventory audit report provides an audit trail for the posted inventory transactions in the Chart of Accounts.
Use this report to make comparison between the accounting view (inventory balance accounts) and logistics view (inventory value displayed by the audit report). The report explains the value changes in inventory accounts.
This report does not recalculate the item cost, but displays the information from the database. IN addition, only inventory related transactions are displayed in the report.
Transactions with non-inventory items or drop-ship warehouse are not displayed.
Note that the Inventory Audit report is available only for companies using the Perpetual Inventory system.
To create what-if scenarios, use the Inventory Valuation simulation report.
Let us take a look at how to use the inventory audit report to view transactions we just made for our FIFO and standard cost items.
We can see the Inventory transactions created automatically by the Purchase and Sales transactions for the inventory items.
Inventory > Inventory Reports > Inventory Audit Reports.
Now I will choose the FIFO item and the standard cost item. I will leave the
date range open to include everything. I choose OK to run the report.
I see the cumulative quantity and the stock value for each item. If I expand the first item, I can see details of the item's transactions from a cost perspective. I see items listed. First I see two Goods Receipt PO with the Purchase costs for the two purchases. The nest two rows are for Delivery. Because the Delivery involved two layers, two warehouse transactions were created for the Delivery.
If we look at an expansion of the standard cost item, we see two Goods Receipt POs and one Delivery. In this case though, the standard cost remainins at 100 on both Goods Receipt POs regardless of the Purchase price of the item.
If you find there is a need to make adjustments to certain
items' inventory value or their unit cost, use the Inventory Revaluation
document.
Inventory > Inventory > Transactions > Inventory Revaluation
Here you can post an inventory Debit and Credit, or identify a new unit cost for these items.
Non-Perpetual Inventory System
A non-Perpetual Inventory system is an inventory management system in which costs of inventories are not maintained on a constant basis.
In non-Perpetual Inventory system, sales, purchasing, inventory, and production transactions, which reflect the inventory levels, do not generate inventory related monetary entries directly into the General Ledger.
Therefore, the inventory value of a company is not revalued on every inventory release or receipt.
Instead, the inventory account balance is updated by manual Journal Entry once in every accounting period or after a physical inventory count.
The inventory value can be calculated using the inventory valuation report.
You must set up a non-Perpetual Inventory system during the basic initialization of the company, before any transactions have be posted. Once transactions have posted, you cannot change the inventory system used for that company.
Note that some countries have a non-Perpetual Inventory system as their default inventory management system, such as Germany, Israel, Italy, Panama, South Africa, and Switzerland.
In SAP Business One, the Inventory Valuation report is central to the non-Perpetual Inventory system.
To calculate the value of inventory at any time, you need to run the Inventory Valuation Report. This report lets you obtain an up-to-date valuation of the existing inventory and to create what-if scenarios.
The report uses one of five selected valuation methods to
estimate the total inventory value:
Moving Average,
FIFO - first in first out,
LIFO - last in first out,
by price
list, and
last evaluated price.
Posting Periods [Time: 09:30 min.]
For a new company database is defining the company Posting Periods:
Here, you can see on overview of the Posting Period
Process. That way, postings to each month can be controlled.
The third stage is Period-End Closing where you move all [121] Profit and Loss (P&L) account balances to the [117] Retained Earnings Account and zero out the P&L accounts.
We will discuss the Period-End Closing process in a different course.
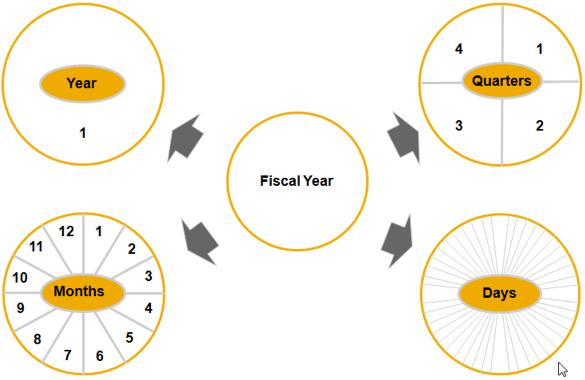
When you create a new company database, you create the Posting Periods for the first Fiscal Year: Year (one sub-period), Quarters (4 sub-periods), Months (12 sub-periods), Days (any number of sub-periods).
Sub-Periods are created automatically by system in the fiscal year based on your selected type of sub-period.
Using you selection, the system automatically creates the corresponding number of Posting Periods. You can change these periods, if necessary.
When creating new Posting Periods, bear in mind the following important caveats:
We recommend creating the Posting Periods from the oldest and up. Consider the oldest data you would like to migrate to determine the first period.
You cannot have overlapping Posting Periods.
G/L Determination is saved by period and is copied from the previous period to the next.
Therefore it is recommended to create the oldest period, make your primary account selection, and then create additional periods.
You can change the G/L Account Determination before starting to work with a new period.
Although you could change it mid-period, we do not recommend this because account determination influences the financial reports.
Remember: You need decisions together with the client accountant. Together you should consider topics like legal reporting and business consolidation.
Note that practice of how to create a new company will be covered in TB1200.
Administration > System Initialization > Posting Periods
The first Posting Period must be defined at the time the company database is created.
In Posting Periods window you can update the generated periods' settings such as date ranges using the link arrow of the period. From this period you can update the generated periods' settings such as date range using the link arrow of the period.
This company works with Month as the sub-period.
Notice that the current period status, as well as the status of the following periods, is Unlocked.
In this window you can also create new periods by choosing the
New Period option.
Note that you can create Posting Periods for future fiscal years at any time.
Here, I define main Posting Period for the Fiscal Year.
Then I define the sub-periods in the fiscal year. I can choose from Year,
Quarters, Months, or Days.
I know that this company runs the annual financial statement once a year. However, they need twelve Posting Periods for their internal controlling so I choose Months and the Add.
New periods appear in the Posting Periods list.
Now let us see how we use Posting Periods in everyday work. I create an A/R Invoice for one of the customers.
The posting date of the invoice will register the document automatically to the appropriate sub-period. I add the A/R Invoice.
Reports > Financials > Accounting > General Ledger
If issue the General Ledger for the current sub-periods, I see the transaction of the A/R Invoice I have just added.
It is also important to mention that one main objective of creating Posting Periods is to analyze the financial performance of a company between periods. For example, compare the current accounting period with the previous period of the same year, or the same period of last year.
System provides different reports for this purpose: Balance Sheet Comparison, Trial Balance Comparison, [121] Profit and Loss Statement Comparison.
Reports > Financials > Comparison > Balance Sheet Comparison, Trial Balance Comparison, [121] Profit and Loss Statement Comparison.
Period-End closing
[Time: 17:40 min.]
You company creates a financial statement once a year:
- They need twelve Posting Periods for internal controlling
- You have defined the Fiscal Year as the calendar year and sub-periods as Months
- The company will not run the Period-End Closing process at the end of each
month
- Instead they will run it at the end of the Fiscal Year
- There are many period-end tasks they do at month end. For example, each month
they do Internal Reconciliation and send debtor statements for outstanding
debts.
- The accountant follows a list of steps for Year-End closing
There is a lot of preparation needed for the period-end.
Posting Periods - Process Overview
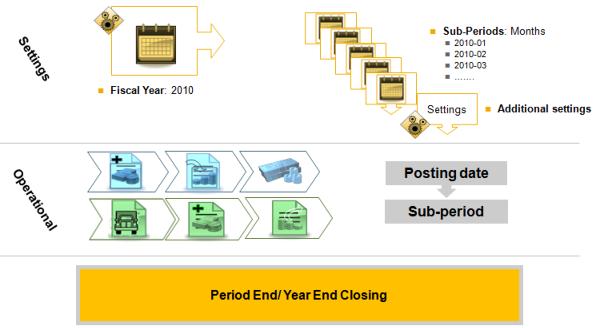
Here, you can see an overview of the Posting Periods Process.
There are three stages in the Posting Periods process.
In this course we will focus on Period-End Closing, the last stage of the process.
In the first stage, we define settings for Posting Periods.
First we define the main Posting Period for the Fiscal Year. Then we define the sub-periods in the fiscal year: Year, Quarters, Months, or Days.
The second stage is the Operational stage.
In everyday work, we enter documents and manual journal entries with a posting date that will be registered automatically to the appropriate sub-period. Sub-periods allows the user to control posting into them, that way, postings to each month can be controlled.
The third stage is what we will focus on: the Period-End Closing process.
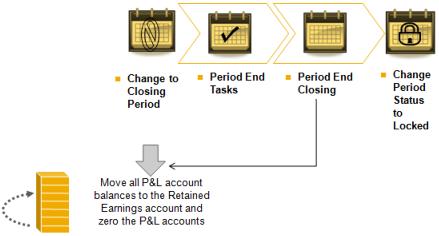
The third stage is what we will focus on: the Period-End Closing process.
- Change to Closing Period
- Period End Tasks
- Period-End Closing (Move all P&L account balances to the
[117]
Retailed Earnings
account and zero the P&L accounts)
- Change Period Status to Locked
There are four tasks in Period-End Closing.
First you change the Posting Period status to Closing Period. This status will limit who can post to the period.
Then you perform the year end tasks, such as reconciliation.
Then you use the Period-End Closing utility to close the period. This step will move P&L account balances to the [117] Retained Earnings account and zero the P&L accounts.
Finally you change the period status to locked.
The Period-End Closing process is typically done at the end of a financial period that is a year in length. You do that using Period-End Closing window.
You can, however, close a Sub-Period too.
Period-End Closing: at the Month End vs. at the Year End
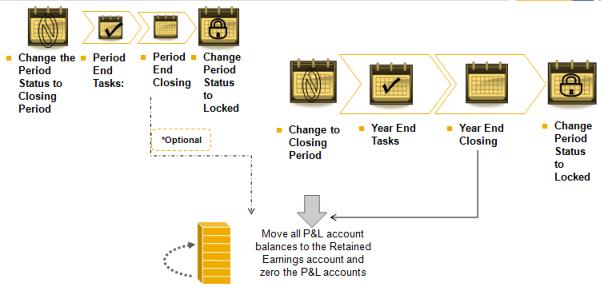
Remember our business example. Your company's main period is a year, but you also have monthly sub-periods.
You have decided not to close each sub-period, although you perform monthly period-end tasks. This is because you use the sub-periods mainly for internal controlling. When you company does the Year-End Closing, at that point, your company closes all the sub-periods.
Other companies may choose to close each sub-period at the end of each sub-period.
Since they have already closed Sub-Periods during the year, they close the last sub-period of the fiscal year.
In either case, to prevent users from creating documents for the previous fiscal year, you can change the status of the period you are about to close to Closing Period. This means that only authorized users can post data, documents, and transactions.
The key purpose of the Period-End Closing is to prepare the accounts for submission to the authorities and therefore involves the re-setting of the P&L account to zero so that the next period can begin again collecting P&L data that is relevant to it.
You the close or inactive the Sub-Posting Periods in the fiscal year by locking them using the Period Status field in the Posting Period window.

In a company that closes a period on a quarterly basis:
- A Delivery note with a large amount of items was posted on March 31st
- The A/R Invoice for this Delivery was issued on April 2nd
Would that be a problem in the [121] Profit and Loss report for first
quarter?
We need to consider the effects of his scenario on the periodic financial reports.
Lets us see the Journal Entries including the involved
accounts, on the documents that were issued in different periods: the Delivery
and the A/R Invoice based on the Delivery.
Debit Credit
Cost of Goods Sold Account [601]
3500
Inventory Account
[345]
3500
First, in the Delivery - the [601] Cost of the goods sold causes a negative effect on profitability in period 1.
Debit Credit
Customer [411]
4400
Income account [701]
4400
In the A/R Invoice - the revenue is booked to the period 2.
This reflects in the periodic Financial Reports.
If the business is closing periods and reports on a quarterly
basis, it shows a 'loss' for period 1 and 'gain' in period 2.
Therefore, one the Period-End Tasks will be: to ensure you invoice all
deliveries in the same period.
Here are some examples for Period-End Tasks:
Make a backup of your database and put in an off-site storage location
Here are some example for Year-End Tasks:
- Post Doubtful Debts that you feel may not be recoverable
- Post Exchange Rate Differences and conversions
differences Post final transactions for the period in all
modules and any adjusting entries in the General Ledger
- Close the last period of the fiscal year
- Print any year-end reports, such as a final detailed Trial Balance and
Financial Statements
- Set up a new fiscal year (if you have not already done so)
- Backup to save the status of the previous fiscal year
I highly recommended that you refer to the how-to-guide entitled Tips for Year-End Closing.
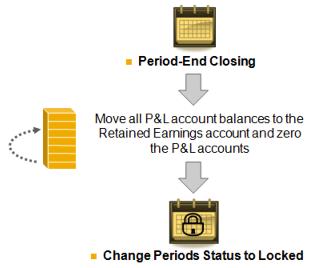
Period-End Closing > Move all P&L account balances to the [117] Retained Earnings account and zero the P&L accounts > Change Periods Status to Locked
The [117] Retained Earnings Account is a Balance Sheet account in the Capital and Reserves drawer [300000000000000]. Capital and Reserves is called Equity in some localization, such as the United States.
After the period-end tasks are complete, we now are ready tu
run the Period-End Closing utility to close the fiscal year.
This action will zero all Profit and Loss account balances to the
[117]
Retained
Earnings Account.
The
[117]
Retained Earnings Account is a Balance Sheet account in the Capital and
Reserves drawer.
Capital and Reserves is called Equity in some localizations, such as the United
States.
After closing the period, the [117] Retained Earnings Account contains the total brought-forward cumulated profit.
The next period can then begin again collecting P&L data that is relevant to it.
You then close or inactivate the sub-Posting Periods in the fiscal year by locking them.
With the Period-End Closing utility, you can choose P&L accounts and periods, and specify a [117] Retained earnings and Period-End Closing account.
When you execute the Period-End Closing, the system generates a list of proposals for closing entries. You can accept each proposal individually.
Example for one account: When we run the Period-End Closing utility for [605] Water Expense Account, we get a proposal for closing entry.
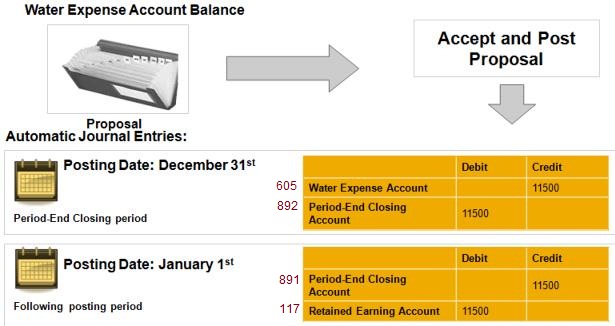
[605] Water Expense Account Balance > Accept and Post Proposal:
Posting Date: 31 Dec
Debit Credit
[605] Water Expense Account
11500
[892] Period-End Closing Account
11500
When you accept the proposal for the account, two transactions are created for each account and two Journal Entries are automatically created to reflect those transactions.
In the first Journal Entry, the system transfers the account balance from the Expense and the Revenue accounts to the Period-End Closing account on the same day (the last day of period). This sets the accounts balances to zero.
The period-End Clearing Account is a temporary or [581] Clearing Account which holds the balance until beginning of the new period.
The second Journal Entry is created at the same time as the first, however the second Journal Entry is dates on the first day of the following Posting Period.
Posting Date: 01 Jan
Debit Credit
[891] Period-End Closing Account
11500
[117] Retained Earnings Account
11500
On the first day of the following Posting Period, the system transfers the balance from the Period-End Closing account to the [117] Retained Earnings Account.
Now, the [117] Retained Earnings Account, which is a Balance Sheet account, contains the total brought-forward cumulated profit.
You can recognize Journal Entries posted by Period-End Closing Utility, because they have the origin "BC".
In the Balance Sheet report, you can later choose whether to include or exclude these of transactions by selecting the add Closing Balances box.
If you make postings after entering the balances carried forward, you need to repeat the Period-End Closing routine to include these subsequent postings.
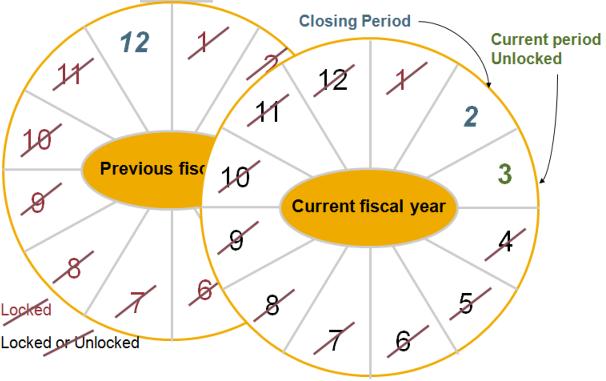
Let us review the status available for Posting Periods.
For example if we look at the graphic we see the current fiscal year.
We are currently in sub period 3.
The current sub period is unlocked.
In everyday, when a Posting Period is Unlocked, anyone can post transactions
with a posting date that falls within the period start and end.
At the end of a Posting Period, after all business transactions belonging to
that period have been posted to the system, you can lock the period so that no
additional postings can be made by any user.
If we look at the first sub period of the current fiscal year, we see it is
locked as well as all sub periods in the previous year, except period 12.
During the first periods of the new fiscal year you may need to make postings
for the Year-End Closing of the previous fiscal year.
The last period of the old year (sub-period 12) has the status
"Closing Period".
As well as Unlocked and Locked, you can set the period status
to: Unlocked Except Sales. If the period has this status, authorized users can
post any document or Journal Entry to the period except for documents from Sales
A/R menu.
Closing Period. In Closing Period only authorized people can post transactions to the period.
You can have the system automatically change the status to Closing Period by selecting the checkbox on the Posting Periods screen.
If the curent period is Month 3 of the current year, this have Unlocked status. Sub Period Month 12 of the previous fiscal year and sub period 2 (for example) of the current year have status Closing Period. Period Month 1 is Locked.
We will run the Period-End Closing utility.
At the end of a period, in our example the end for the year, I transfer the balances of the [121] Profit and Loss accounts to a [117] Retained Earnings Account.
Administration > Utilities > Period-End Closing
All [121] Profit and Loss accounts are chosen. I choose the [117] Retained Earning and the Period-End Closing accounts. I enter a document Date and I choose 2 [60*] Expense Accounts which I want to clear.
I review the Remarks field to be registered in the created Journal Entries. I then execute the report.
Two Journal Entries are automatically created for each account.
In the first transaction, the system transfers the account
balance from the [60*] Expense Account to the Period-End Closing account at the last
day of the period.
Note that Journal Entries posted by the Period-End Closing Utility have the
origin "BC".
For second transaction, at the same time but with the first day of
the following Posting Period as posting date, the system transfers the balance
from the Period-End Closing account to the
[117]
Retained Earnings Account. So, the
Period-End Closing is a
[408] Clearing Account.
Now, the [117] Retained Earnings Account, which is a Balance Sheet account, contains the total brought forward cumulated profit.
Let us also review the [60*] Expense Account balances in the Chart of Accounts. The balance of the account is zero.
If I make postings after entering the balances carried forward, I need to repeat the Period-End Closing routine to include these subsequent postings.
Administration > Utilities > Period-End Closing
Note, that you can store the results initially as a report and then post them at a later stage.
At end of a Posting Period, after all business transactions belonging to that period have been posted to the system; I can lock the period so that no additional postings can be made.
Administration > System Initialization >
Posting Periods, and then click the orange navigation arrow for the period I
want to lock.
I change the period status from Unlocked to Locked.
Once I change
the period to locked, no on post it.
If the period is in the status unlocked
except sales or in the status closing period, only authorized users can make
posting.
Authorization are controlled in the General
Authorization window under:
Administration > System Initialization >
Authorization > General Authorizations. I choose a user. I choose
General, then scroll down to see Period Status. She has full authorization to
post to Unlocked except sales, however she cannot post to a period with the
status closing period because she has no authorization.
Currencies [Time: 20:35 min.]
Decision about these definitions should always be made together with the client accountant.
You discuss the currencies definition with Maria the accountant:
- The customers are local customers, therefore located in the
United Kingdom
- However a few customers and vendors are located in other country, specifically
the US.
- They price some of their items in a foreign currency for local customers. For
example US Dollars
Also, they price some of their items in a foreign currency, in this case, in US Dollars for local UK customers.
You tell Maria about working methods with currencies in SAP Business One.
OEC Computers is located in UK, but they are pricing some of
their items in US Dollars for local UK customers.
- What will the currency of the A/R Invoice total amount?
- What will be the currency in the automatic Journal Entry created by A/R
Invoice?
In this example, OEC Computers will define prices in the price list in US currency and then assign the Price List to the appropriate local UK customers.
Company Level - Local and System Currencies
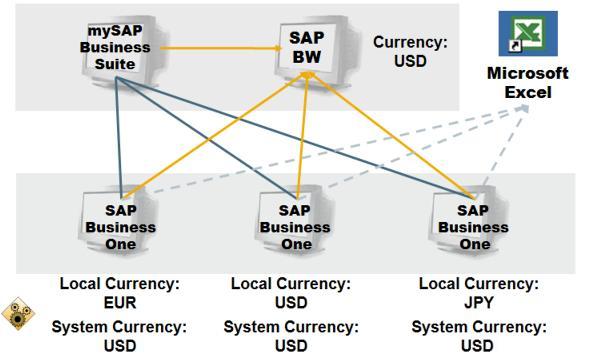
SAP Business One can handle accounting in two parallel currencies: the local currency and the system currency.
The Local currency is defined in
Administration > System Initialization > Company Details and
is the currency in
which the company is legally required to keep its books. In our example, British
Pound.
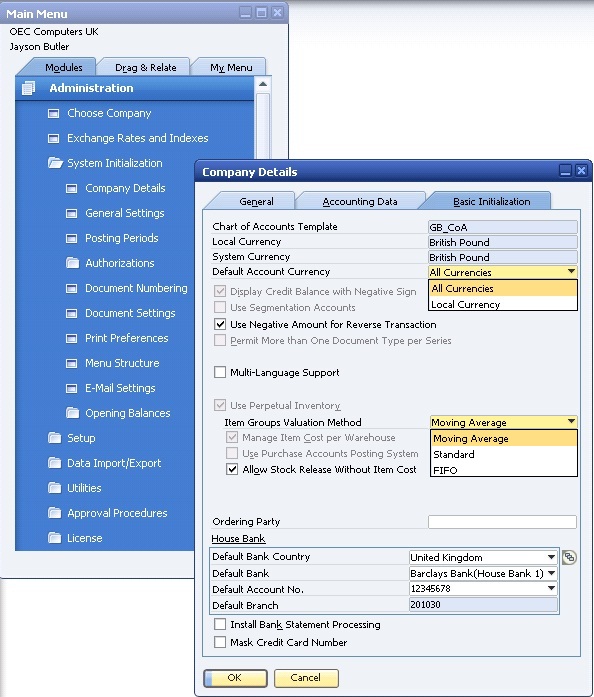
The system currency may be different currency that the local currency and is especially useful for subsidiaries of global companies whose head office uses a different currency than the subsidiaries (for example, EUR in the subsidiary and USD in the head office). In this case the system automatically calculates all postings in the local currency and manage an additional account balance in the system currency in real time.
This makes it easier to have aggregates reporting on all the subsidiaries and allows for better integration with the system of the head office. For example, you could export the financial data in system currency from the SAP Business One systems of the subsidiaries to the SAP Business Suite or the SAP Business Information Warehouse of the head office.
Alternatively, financial consolidation can be done with Microsoft Excel or any other product based on the financial data in system currency.
Company Level - Local and System Currencies
In our example, OEC Computers is a local company and does not have a reporting requirement in another currency. Therefore you set the System Currency to the Local Currency - British Pound.
It is important to remember that you cannot change the Local or the System Currency once you have started to work with the database.
In addition to the system currency, you have an option to present financial reports in any foreign currency.
Use the Revaluation option to choose the revaluation method and currency.
The system calculates all the balances in the selected currency, while running the report.
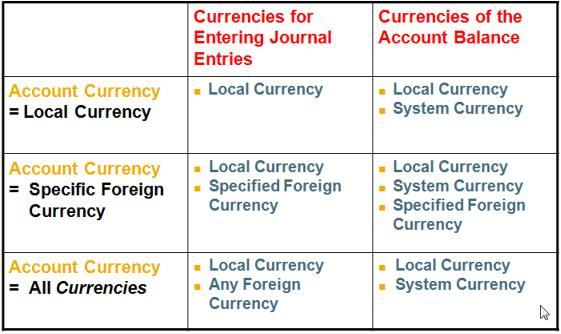
Each Business Partner Master Data record and each G/L Account
needs to have an account currency definition:
The system sets the Local Currency as the default currency for all Business
Partner Master Data records.
You can define default currency for new G/L Accounts using the
Default Account Currency field on the Basic Initialization tab under the
Company Details transaction in System Initialization.
Administration > System Initialization > Company Details >
Basic Initialization: Default Account Currencies
In our example, the currency for most vendors and customers of OEC Computers will be defined as British Pound (Local Currency). The vendors and customers from the US will be defined in USD (Specific Foreign Currency).
The company Bank Account will be defined as All Currencies since it needs to register Journal Entries and documents in more than one specific Foreign Currency (for example, bank transfers).
The table slide details the option for entering Journal
Entries and viewing the Account Balance for each option of the Account Currency
- Local, Foreign and All Currencies:
- In first row, we see that if the currency of the account is "local currency"
then Journal Entries are entered in the local currency, but the account balance
in shown in both the local currency and the system currency, assuming the system
currency is different from the local currency. This account is reconciled in
local currency.
- In the second row, the account currency has been set to a specific foreign
currency. In that case, you can enter Journal Entries in the local currency as
well as the specific foreign currency. You can display the account balance in
the specific foreign currency as well as in the Local and System Currencies. This
account is reconciled in foreign currency.
- In the last row, the account has been set to "all currencies". In that case,
you can enter Journal Entries in any foreign current currency that has been set
up the company, as well as in the local currency. The account balance will
display in the local currency and the system currency. This account is
reconciled in local currency.
You can, at any point, change an account currency to All-Currencies, but once you update the account, you will not be able to change it back to either a local or specific foreign currency.
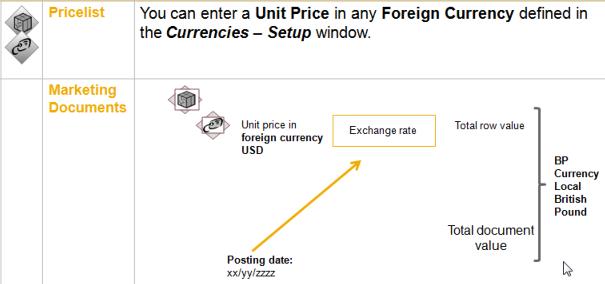
Pricelist also contain currencies. You can enter a Unit Price in any Foreign Currency defined in the Currencies - Setup window.
When you enter a Business Partner into a marketing document, the Business Partner's Currency and their pricelist automatically default into the document. Users do not need to worry about the currency.
SAP Business One will automatically convert total row value and the total document value to Local Currency, System Currency and Business Partner Currency, depending on the Business Partner's currency.
The initial exchange rate used is based on the posting date of the document.
Demo - Currencies in the Price List
We will review the conversion of foreign unit price in SAP Business One.
Administration > System Initialization > Company Details > Initialization tab. I define the local currency and the system currency on the basic Initialization tab.
In our example, the company is a local company and does not have a reporting requirement in other currency. Therefore I have set the system currency to the local currency - British Pound.
Note that I cannot change the Local or System Currency once the company started to work with database.
Inventory > Item Master Data: Pricelist Unit Price
In the Unit price field I can enter a Unit Price in any Foreign Currency defined in the Currencies - Setup window. Usually, a separate Price List is defined for foreign currency transactions.
Now, I issue an A/R Invoice for local customer. Since the default Price List defined for this customer is his Payment Terms is the distributor Sales Price.
Note: that the total row amount and the total document value are converted and presented into the Business Partner's currency - the local currency. 10:50
The calculation is done according to the exchange rate set for
the document posting date in
Administration > Exchange Rates and Indexes window.
If I not enter a value for a specific day, the Exchange Rates and Indexes window will popup when I create a document involving a foreign currency. For example, when I choose a foreign currency Business Partner or an item with foreign currency unit price like in our example.
Note: I can choose to display the total row and the total document values in local, system or Business Partner currency using the drop down menu in the document header.
I add the A/R Invoice. In Journal Entry, we can see hat the amounts are calculated in the local currency.
Delivery > A/R Invoice > Good Receipt PO > A/P Invoice
The exchange rate of a foreign currency can change daily. This affects documents you create for a foreign business partener, or prices you manage in a foreign currency for local Business Partners.
When you create a sales or purchasing document based on existing documents (Copy From), SAP Business One opens the Draw document Wizard window where you can define factors that affect the target document you create.
Demo - Currencies in the Draw Document Wizard
We will review the options regarding Row Exchange Rate for Prices in the Draw Document Wizard.
In this demo we will review the options regarding Row Exchange Rate for Prices in the Draw Document Wizard.
Let us say that a different customer ordered a item last week. Today I issue an A/R Invoice based on this order.
The exchange rate for USD changed since I issued the Sales Order in the Draw document Wizard, I can see the options for the Row Exchange Rate to be used. According to my agreement with the customer, I choose to apply the same rate as the Sales Order and to debt the customer on the same amount the items were offered to him. Therefore, I choose the first option: Use Row Exchange Rate from Base Document.
Note, that I do not choose the second option: Use Document and Row Exchange Rate from Base Document, as this is a local customer and the document rate is not relevant here, only the row exchange rate.
Other options is: Use Current Exchange Rate from the Exchange Rate Table.
Clic Draw all Data (Freight and Withholding Tax)
I choose Finish. In the A/R Invoice, I see that the total row and the total document values are the same as in the Sales Order. I ass the A/R Invoice.
Posting Exchange Rate Differences
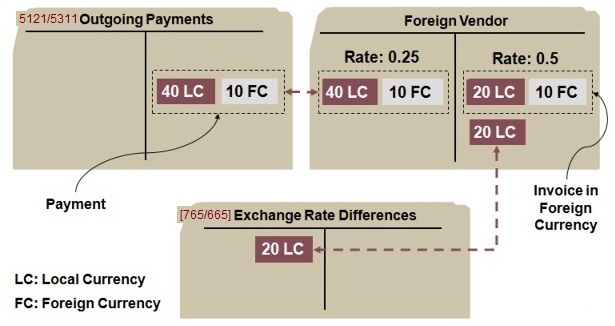
Exchange rate fluctuations ca cause Exchange Rate Differences
when you pay invoices in foreign currencies:
The figure shows an A/P Invoice which has been issued by a foreign vendor in
foreign currency.
At the posting day of the invoice the exchange rate was 0.5. The system converts the 10 units foreign currency into 20 units local currency and posts both values in parallel on the credit side of the [401] Vendor Account. At the time when you post the payment for this invoice the exchange rate has changed to 0.25. 10 units in foreign currency are now equal to 40 units in local currency.
Compared the value at the time of the invoice there is an Exchange Rate Difference of 20 units local currency.
When you post the payment the system automatically posts this Exchange Rate Difference to an Exchange Rate Difference account. The system posts the Exchange Rate Differences as expense or revenue to the accounts that you have entered in G/L Account Determination window
Demo - Posting Exchange Rate Differences
We will se how SAP Business One posts exchange rate differences automatically. Exchange rate fluctuations can cause rate differences when you pay invoices in foreign currencies.
Let us look at an A/P Invoice which has been issued by a foreign vendor in foreign currency a week ago. I entered the A/P Invoice to the system with its' original posting date. At the posting day of the invoice the exchange rate was xx.
Note that currency field is retrieved from the business partner's currency and the value is retrieved from the exchange rate window with the value entered last week.
Looking at the Journal Entry, we can see the amounts in foreign and local currency at the same time.
Today, I create an Outgoing Payment for the A/P Invoice. The exchange rate changed to a higher rate than the A/P Invoice date.
Note, that the amounts paid are the same in the foreign currency as they were in the A/P Invoice. The vendor is paid in his local currency so he will not notice the difference.
We will see the rate difference in the conversion to local currency.
Let us add the payment. Let us go the payment I have just added and look at the automatic Journal Entry created with the exchange rate difference.
When I post the payment, SAP Business One automatically posts the Exchange Rate Difference from the A/P Invoice posting date to the payment date, to an [765/665] Exchange Rate Difference account.
The system posts the Exchange Rate Differences as expense or
revenue to the accounts that I have entered under
Administration > Setup > Financials > G/L Account Determination > Purchasing tab
> in the [765] Realized Exchange Diff. Gain field
and the
[665]
Realized Exchange Diff Loss field.
The same settings exists for the sales side.
Exchange Rate Differences, Conversion differences at Period-End Closing
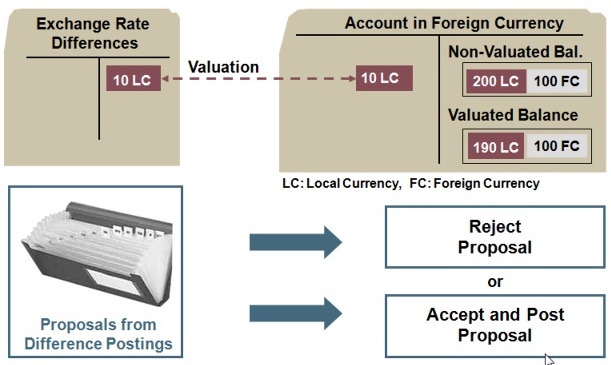
Business Partner accounts and General Ledger accounts that you manage in a foreign currency post an account balance in the respective foreign currency and an account in the local currency.
The balance in the local currency comprises the foreign currency items that were translated using the exchange rate in the exchange rates table at the posting date or the tax date. In other words, the balance is based on past exchange rates.
At the Period-End Closing, therefore, you have to valuate the foreign currency account balance with the exchange rate on the closing key date.
For this purpose you have the Exchange Rate Differences option in the Financials module. When you execute this function, the system generates a list of proposals for differences postings. You can accept or reject each proposal individually.
In addition to the local currency, the system also manages your data in the system currency in parallel.
If your company's local currency is different from the system currency, Exchange Rate Differences can arise. The system cleat these differences automatically.
This is carried out using the Conversion differences function under the Financials module the same way as the Exchange Rate Differences.
Cash Management Reports [Time: 22:01 min.]
Maria, the accountant of the company, tells you that controlling the customer receivables status and minimizing payment time is crucial for their business. You tell Maria that SAP Business One provides her with the tools to manage customer receivables.
You introduce three tools to control customer receivables:
- Cash Flow Report that helps you forecast the monetary status
of the company
- Customer Receivable Aging Report so you can quickly identify
late payments
- Dunning Process that enables active of open A/R Invoices
Which report provides you with a forecast of the company monetary status?
Totals and Balances (Per Time Interval) of:
- Cash
- Credit Card Vouchers +
- Checks Received +
- Customer Liabilities +
- Payables to Vendors -
Cash Flow is a forecast report - The report provides information about the liquidity of your business that is beyond the scope of a Profit and Loss Statement.
It displays the Balance Sheet Accounts which reflect the monetary value of the company.
The Cash Flow report lists the totals and balances of both the accounts that represent cash holdings and the accounts that expect a cash flow in the future (either incoming or outgoing) for the interval you have requested.
Cash Flow Report in SAP Business One
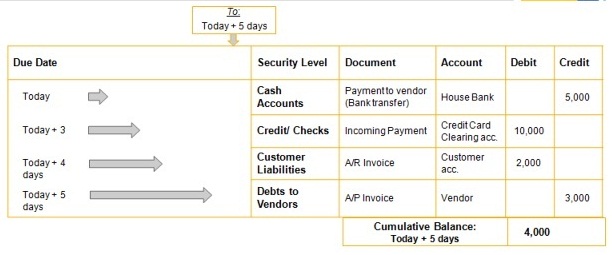
Cash Flow runs on: Open transactions - not reconciled (with the option to Display Fully Reconciled Postings). And on the transaction Due Date.
The Cash Flow is displayed according to: The level of probability that the transaction will turn to cash (incoming and outgoing).
The probability that a cash flow can be expected varies considerably. For this reason, the system assigns the balances to various security levels. Security here means the level of certainty with which an account balance is relevant to the cash flow.
The cash flow display also includes Time Intervals.
Now we will look at a forecast of our cash flow.
Financials > Financials Report > Financial > Cash Flow
The Cash Flow run on the transaction Due Date. Therefore, I
have one selection criteria for dates which refers to due dates only.
The date range should be in the future, since this report gives me a forecast of the company's monetary value looking forward.
Posting that have not yet been made when the report is compiled can be included manually and assigned to a security level.
Let us imagine that we intend to sell the company's car next month for an estimated price of 10'000 euro. In the first row I enter a date, a description and the Incoming payment: 10'000. Furthermore, I can decide if I want to include recurring postings or Journal Vouchers into consideration.
In the different tabs on the upper right side I selected the accounts and Business Partners to be included in the report. The amounts transferred through these accounts will appear in the report at the appropriate security level.
Cash - all cash accounts are assigned to this level. You define an account as cash account in the Chart of Accounts > G/L Account Properties. You can see a properties Cash Account is enabled.
Credit card vouchers - all accounts for credit card vouchers are assigned to this level. Credit card vouchers - all accounts for credit card vouchers are assigned to this level. This means that checks with a future due date, that were not deposited yet, appear in the corresponding time interval.
In the Business Partner tab. Customer Liabilities - all [411] Customer Accounts are assigned to this level.
The default setting is not including Fully Reconciled Postings in the report.
I can have the system calculate the opening balance based on existing data, or enter it myself. For example, if I didn't finish my bank reconciliation, I may want to enter the opening balance manually.
I set 'Monthly' as the time interval and choose OK to issue the report.
The cash flow display includes Time Intervals according to the definition I set in the selection criteria window. Let us focus on June.
The report present open transactions - that are not reconciled. The transactions are displayed according to the level of probability that the transaction will turn to cash - incoming and outgoing.
This way you can forecast the timing of future revenues and expenses to facilitate your business decisions, and investigate the details of any you do not recognize.
I can expand each time interval to see more information. I see the total by security level. The cash accounts represent money I already have.
The credit and checks represent credit cards vouchers and checks that are due in the future. This amount will increase the total balance.
Customers' liabilities include open invoices that are due in the future, or that were not paid yet, and increase the total balance.
The debts to vendors include open A/P Invoices that will decrease the total balance.
For each transaction we see the credit, debit and total amounts. This means that the balance is always displayed for each detailed row.
Negative balances are indicated by a minus sign (-).
Recurring transactions and the manually added transaction appear in green. I can drill down to each transaction using the linking arrow.
As you can see, the cash flow report gives you information about the liquidity of your business that is beyond the scope of a profit and loss statement, allowing you to act in timely manner.
The Sales process affects the cash status of the business.
- How can company improve Cash Flow Results?
- What kind of options does a company have to optimize their cash flow?
- How can they ensure that a timely invoice is generated to enhance positive
cash flow?
Some background to this question: even when it is profitable, a company can go bankrupt due to cash flow problems. Keeping a positive cash flow is crucial.
The company can improve the Cash Flow Results by:
- Defining the appropriate Payment Terms for each of your customers
- The Customer Receivables Aging report is the monetary controller of the Sales A/R module.
Payment terms influence sales documents; due dates and expected payments.
You can see the effect of the Payment Terms in the Cash Flow, Aging report and Dunning. You can also set default Payment Terms for customers and vendors in System Initialization, under General Settings on the Business Partner tab. The default Payment Terms are used when you set up a new customer, but you can adjust the Payment Terms in a customer master to reflect the payment risk involved with that particular customer. Then monitor the credit-worthiness of your customers in the customer receivables aging report.
The Customer Receivables Aging report is the monetary controller of the Sales A/R module.
So let us take a deeper look at what the customer receivable aging report shows us.
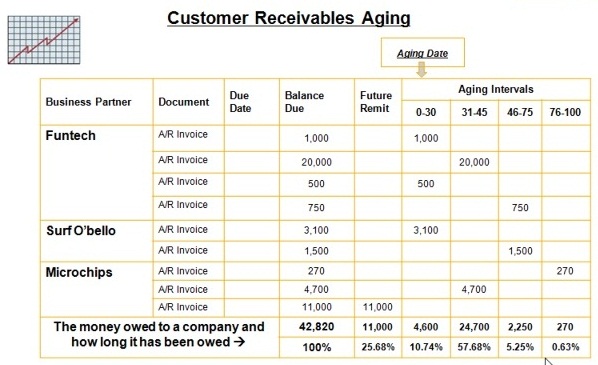
The customer receivables aging report shows all the money owed to a company an how it has been owed. This is as key report for managing the company's cash flow as well as evaluating the credit quality of customers.
SAP Business One is shipped with two reports for monitoring
the due dates for open customer receivables and vendor liabilities:
- Customer Receivables Aging
- Vendor Liabilities Aging.
Both reports allow you to restrict the information to certain Business Partner accounts.
You can specify an aging date after which the due dates are to be calculated.
You can also specify interval in days, months or periods after which items that are overdue are to be grouped.
As you can see in the graphic, this report gives you quick look at how overdue you invoices are. The invoices are groped by aging date. At the bottom of the report, you can see the percentages of overdue invoices in each in aging interval.
Demo - Customer Receivables Aging
Let us take a look at how the customers receivables aging report gives an analysis of our open customer receivables.
For start Cockpit: Administration > System Initialization >
General Settings > Cockpit: Enable Cockpit at Company Level.
Tools menu > Cockpit > Enable My Cockpit.
Administration > Choose Company.
Business Partners > Business Partner Reports > Aging > Customer Receivables Aging.
The report allows me to restrict the information to certain Business Partner accounts.
I can also specify interval i days, months or period after which items that are overdue are to be grouped including a flexible definition of interval in days.
I can calculate the number of aging days by posting date, document date or due date.
The report includes expandable list with all Business Partner and document allowing me to drill down to the details in one screen.
At the bottom I can see the summary of all balances due amounts and a summary for each aging group.
Let us take a look at where the likely problems will arise for our cash flow.
You can print the report in different format:
- a summary report that shows all the data shown on the screen, a detailed
receivables aging, that shows by customer all open transactions and their aging
information, or the same detailed report, but as a customer statement, than can
be sent the customer for collection.
As you can see, the customer aging report can be very useful in giving you good overview of the age of unpaid customer receivable and the value of those debts.
- What proactive steps can company take to improve the Cash
Flow Results?
- What kind of options does a company have to ensure timely payments?
- How can they prevent "bad debts"?
Every time goods or service are sold, the liabilities of the respective customers to your business are increased.
From the moment an A/R Invoice is created, Incoming Payments are monitored to ensure that customer debts are paid on time. When they are not, the company needs to activate a multilevel collection process, such as telephone or written reminders, for remiss customer.
SAP Business One provides a dunning wizard for producing reminder letters. It runs through all the customers, checks all outstanding A/R Invoices and transactions that represent debt, and enables you to print and send reminder letters of different levels of severity.
We look at how to perform dunning in SAP Business One.
I will run the dunning wizard to send notices to my delinquent customers, but first, prior to running the Sunning process we will review the setup needed for Dunning levels and Dunning Terms in the company.
Administration > Setup > Business Partners > Dunning Terms
I have already set a standard dunning term for the company.
You can see that the dunning term includes 3 levels: effective 30 days, 60 days
and 90 days after the invoice's due date. This definition will set the automatic
creation of dunning letters. Each customer must be assigned with a dunning term.
It is possible to setup a default dunning term for new
customers on
Administration > System Initialization > General Settings >
Business Partner tab. The dunning term will appear in the Customer Master Data record under the
Payment Terms tab.
Now that we have reviewed how to set up dunning, I will run the Dunning Wizard to view delinquent customers and eventually send dunning notices.
Sales A/R > Dunning Wizard: Next and select the Start a New Wizard indicator.
I do not change the default values on the General Parameters from and choose Next. I choose Ad and Ok to select all customers linked to the dunning term and I Choose Next. I do not change the default values on the document Parameters form and choose Next.
The recommendation report shows me customers and their overdue A/R Invoices. I choose Next.
I select the Print Dunning Letters and Exit option. I choose Finish.
When I open the Business Partner Master Record for the customer for whom I have printed the first letter, I see "1" under the Accounting tab in the Dunning Level field as this was the applied level. In the Dunning Date field, I see today's date.
Note: The level 2 dunning letter will become effective 30 days after the level 1 dunning letter is generated.
In this way, I can send gentle reminder to customers who are late in paying and thereby better manage company Cash Flow.